현대적인 마이크로서비스 아키텍처에서 통합 테스트의 중요성이 날로 증가하고 있습니다.
특히 테스트컨테이너 스프링부트 환경에서는 실제 데이터베이스, 메시지 큐, 외부 서비스와의 연동을 검증하는 것이 필수적입니다.
이 글에서는 Spring Boot와 Testcontainers를 활용하여 Docker 설치 없이도 강력한 통합 테스트 환경을 구축하는 방법을 상세히 알아보겠습니다.
Testcontainers란 무엇인가?
Testcontainers는 Java 개발자들이 실제 데이터베이스나 외부 서비스를 사용하여
통합 테스트를 수행할 수 있게 해주는 오픈소스 라이브러리입니다.
기존의 H2나 임베디드 데이터베이스를 사용한 테스트의 한계를 극복하고, 프로덕션 환경과 동일한 조건에서 테스트를 실행할 수 있습니다.
Testcontainers의 주요 특징:
- 실제 데이터베이스 환경에서의 테스트
- Docker 컨테이너 기반의 격리된 테스트 환경
- 테스트 완료 후 자동 정리
- 다양한 데이터베이스 및 서비스 지원

Spring Boot에서 Testcontainers 설정하기
testcontainers spring boot 환경을 구축하기 위한 기본 설정부터 시작해보겠습니다.
의존성 추가
<dependencies>
    <!-- Spring Boot Test Starter -->
    <dependency>
        <groupId>org.springframework.boot</groupId>
        <artifactId>spring-boot-starter-test</artifactId>
        <scope>test</scope>
    </dependency>

    <!-- Testcontainers BOM -->
    <dependency>
        <groupId>org.testcontainers</groupId>
        <artifactId>testcontainers-bom</artifactId>
        <version>1.19.3</version>
        <type>pom</type>
        <scope>import</scope>
    </dependency>

    <!-- Testcontainers JUnit Jupiter -->
    <dependency>
        <groupId>org.testcontainers</groupId>
        <artifactId>junit-jupiter</artifactId>
        <scope>test</scope>
    </dependency>

    <!-- PostgreSQL Testcontainer -->
    <dependency>
        <groupId>org.testcontainers</groupId>
        <artifactId>postgresql</artifactId>
        <scope>test</scope>
    </dependency>
</dependencies>
기본 테스트 클래스 구성
@SpringBootTest
@Testcontainers
@TestMethodOrder(OrderAnnotation.class)
class UserServiceIntegrationTest {

    @Container
    static PostgreSQLContainer<?> postgres = new PostgreSQLContainer<>("postgres:15")
            .withDatabaseName("testdb")
            .withUsername("test")
            .withPassword("test");

    @DynamicPropertySource
    static void configureProperties(DynamicPropertyRegistry registry) {
        registry.add("spring.datasource.url", postgres::getJdbcUrl);
        registry.add("spring.datasource.username", postgres::getUsername);
        registry.add("spring.datasource.password", postgres::getPassword);
    }

    @Autowired
    private UserService userService;

    @Test
    @Order(1)
    void shouldCreateUser() {
        // 실제 PostgreSQL 데이터베이스를 사용한 테스트
        User user = new User("john@example.com", "John Doe");
        User savedUser = userService.createUser(user);

        assertThat(savedUser.getId()).isNotNull();
        assertThat(savedUser.getEmail()).isEqualTo("john@example.com");
    }
}
통합테스트 자동화를 위한 고급 설정
통합테스트 자동화를 효과적으로 구현하기 위해서는 여러 컨테이너를 조합하고 관리하는 전략이 필요합니다.
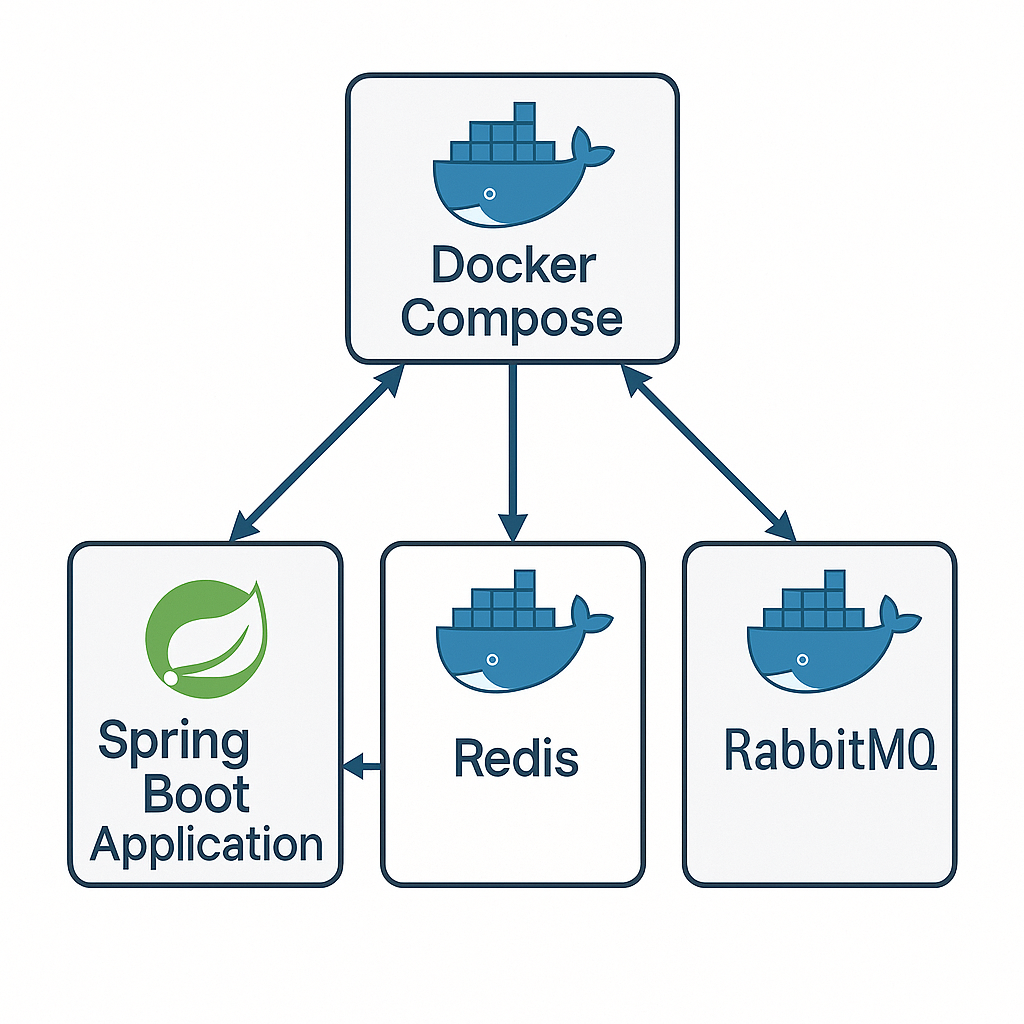
Docker Compose를 활용한 멀티 컨테이너 테스트
@SpringBootTest
@Testcontainers
class OrderServiceIntegrationTest {

    @Container
    static DockerComposeContainer<?> environment = new DockerComposeContainer<>(
            new File("src/test/resources/docker-compose.test.yml"))
            .withExposedService("postgres", 5432)
            .withExposedService("redis", 6379)
            .withExposedService("rabbitmq", 5672);

    @DynamicPropertySource
    static void configureProperties(DynamicPropertyRegistry registry) {
        String postgresUrl = String.format("jdbc:postgresql://localhost:%d/testdb",
                environment.getServicePort("postgres", 5432));

        registry.add("spring.datasource.url", () -> postgresUrl);
        registry.add("spring.redis.host", () -> "localhost");
        registry.add("spring.redis.port",
                () -> environment.getServicePort("redis", 6379));
        registry.add("spring.rabbitmq.port",
                () -> environment.getServicePort("rabbitmq", 5672));
    }
}
테스트 전용 Docker Compose 파일
# src/test/resources/docker-compose.test.yml
version: '3.8'
services:
  postgres:
    image: postgres:15
    environment:
      POSTGRES_DB: testdb
      POSTGRES_USER: test
      POSTGRES_PASSWORD: test
    ports:
      - "5432"

  redis:
    image: redis:7-alpine
    ports:
      - "6379"

  rabbitmq:
    image: rabbitmq:3-management-alpine
    ports:
      - "5672"
      - "15672"

실전 예제: E-commerce 주문 시스템 테스트
복잡한 비즈니스 로직을 포함한 실제 시나리오를 통해 테스트컨테이너 스프링부트의 강력함을 살펴보겠습니다.
주문 처리 플로우 테스트
@SpringBootTest
@Testcontainers
@TestMethodOrder(OrderAnnotation.class)
class OrderProcessingIntegrationTest {

    @Container
    static PostgreSQLContainer<?> postgres = new PostgreSQLContainer<>("postgres:15")
            .withDatabaseName("ecommerce")
            .withUsername("test")
            .withPassword("test")
            .withInitScript("schema.sql");

    @Container
    static GenericContainer<?> redis = new GenericContainer<>("redis:7-alpine")
            .withExposedPorts(6379);

    @Autowired
    private OrderService orderService;

    @Autowired
    private PaymentService paymentService;

    @Autowired
    private InventoryService inventoryService;

    @Test
    @Order(1)
    void shouldCompleteOrderSuccessfully() {
        // Given: 상품 재고 설정
        Product product = new Product("LAPTOP001", "Gaming Laptop", 1500.00);
        inventoryService.addStock(product.getSku(), 10);

        // When: 주문 생성 및 처리
        Order order = Order.builder()
                .customerId("CUST001")
                .addItem(product.getSku(), 2)
                .build();

        OrderResult result = orderService.processOrder(order);

        // Then: 주문 완료 검증
        assertThat(result.getStatus()).isEqualTo(OrderStatus.COMPLETED);
        assertThat(result.getTotalAmount()).isEqualTo(3000.00);

        // 재고 차감 검증
        assertThat(inventoryService.getStock(product.getSku())).isEqualTo(8);
    }

    @Test
    @Order(2)
    void shouldHandleInsufficientStock() {
        // Given: 부족한 재고 상황
        Product product = new Product("PHONE001", "Smartphone", 800.00);
        inventoryService.addStock(product.getSku(), 1);

        // When: 재고보다 많은 수량 주문
        Order order = Order.builder()
                .customerId("CUST002")
                .addItem(product.getSku(), 5)
                .build();

        // Then: 재고 부족 예외 발생
        assertThrows(InsufficientStockException.class,
                () -> orderService.processOrder(order));
    }
}
성능 최적화 및 모범 사례
testcontainers spring boot 환경에서의 테스트 성능을 최적화하는 방법들을 알아보겠습니다.
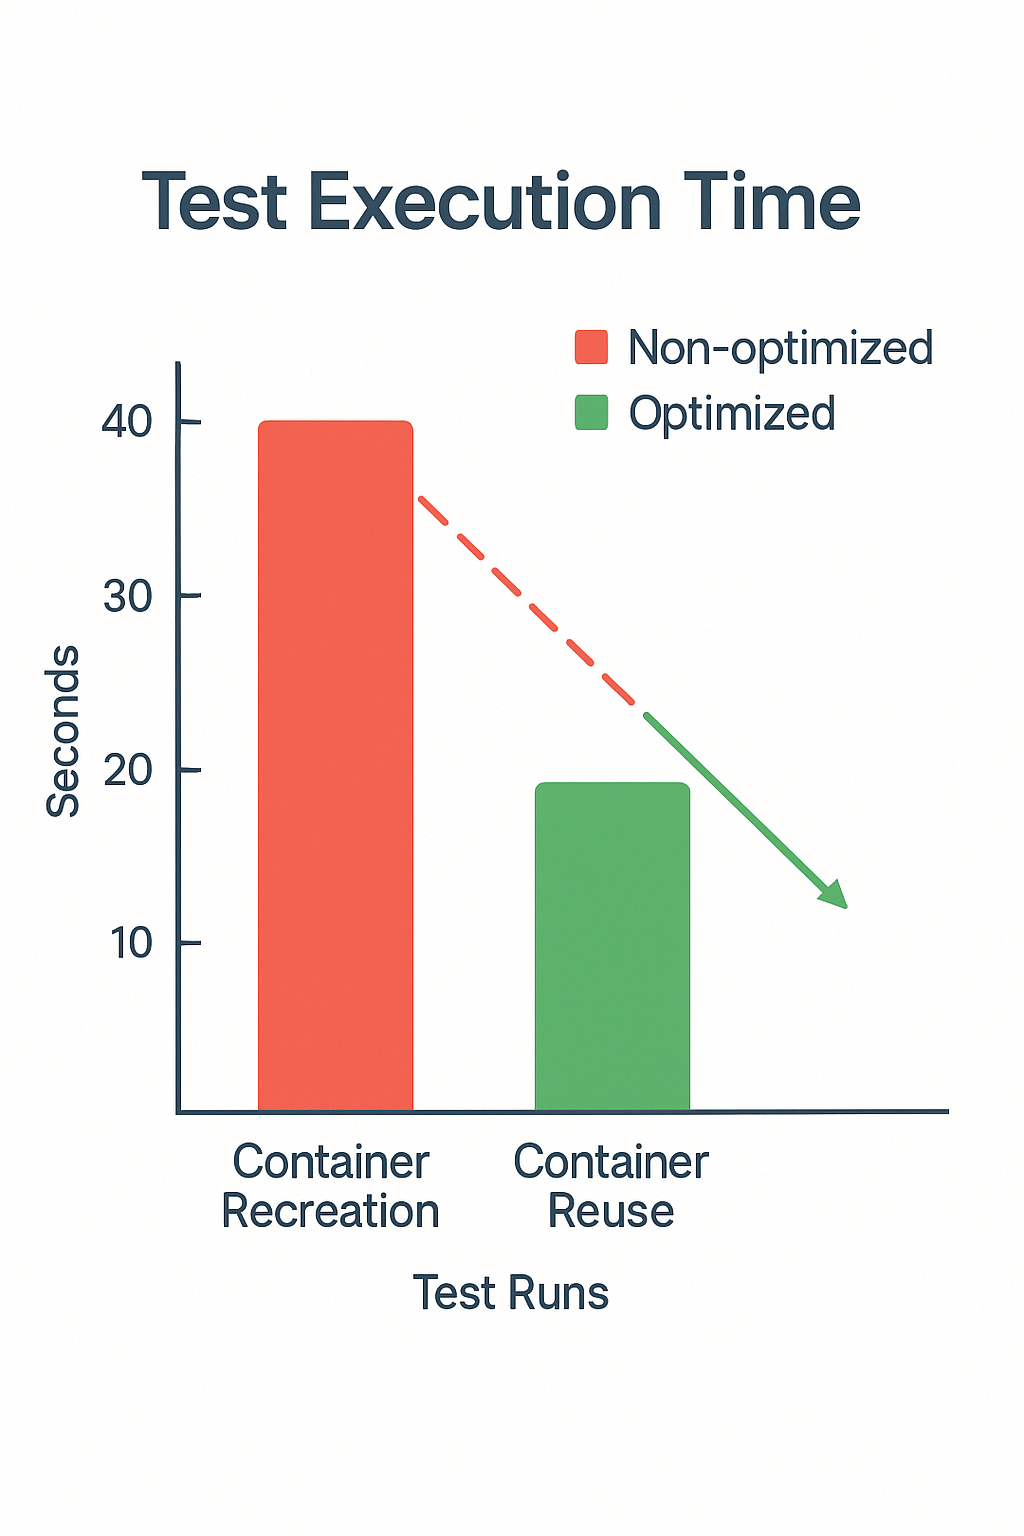
컨테이너 재사용 전략
@SpringBootTest
@Testcontainers
class BaseIntegrationTest {

    // 클래스 레벨에서 컨테이너 재사용
    @Container
    static PostgreSQLContainer<?> sharedPostgres = new PostgreSQLContainer<>("postgres:15")
            .withDatabaseName("shared_testdb")
            .withUsername("test")
            .withPassword("test")
            .withReuse(true); // 컨테이너 재사용 활성화

    @DynamicPropertySource
    static void configureProperties(DynamicPropertyRegistry registry) {
        registry.add("spring.datasource.url", sharedPostgres::getJdbcUrl);
        registry.add("spring.datasource.username", sharedPostgres::getUsername);
        registry.add("spring.datasource.password", sharedPostgres::getPassword);
    }
}

// 상속을 통한 공통 설정 활용
@SpringBootTest
class UserRepositoryTest extends BaseIntegrationTest {

    @Autowired
    private UserRepository userRepository;

    @Test
    void shouldFindUserByEmail() {
        // 공유 컨테이너를 사용한 빠른 테스트
    }
}
테스트 데이터 초기화 전략
@TestConfiguration
public class TestDataConfiguration {

    @Bean
    @Primary
    public TestDataInitializer testDataInitializer() {
        return new TestDataInitializer();
    }

    public static class TestDataInitializer {

        @EventListener(ContextRefreshedEvent.class)
        public void initializeTestData() {
            // 테스트용 기본 데이터 설정
            createDefaultUsers();
            createDefaultProducts();
            createDefaultCategories();
        }

        private void createDefaultUsers() {
            // 기본 사용자 데이터 생성
        }
    }
}

CI/CD 파이프라인 통합
통합테스트 자동화를 위한 CI/CD 파이프라인 설정 방법을 살펴보겠습니다.
GitHub Actions 설정
# .github/workflows/integration-test.yml
name: Integration Tests

on:
  push:
    branches: [ main, develop ]
  pull_request:
    branches: [ main ]

jobs:
  integration-test:
    runs-on: ubuntu-latest

    steps:
    - uses: actions/checkout@v3

    - name: Set up JDK 17
      uses: actions/setup-java@v3
      with:
        java-version: '17'
        distribution: 'temurin'

    - name: Cache Maven dependencies
      uses: actions/cache@v3
      with:
        path: ~/.m2
        key: ${{ runner.os }}-m2-${{ hashFiles('**/pom.xml') }}

    - name: Run integration tests
      run: |
        mvn clean verify -Pintegration-test

    - name: Upload test reports
      uses: actions/upload-artifact@v3
      if: always()
      with:
        name: test-reports
        path: target/surefire-reports/
Maven Profile 설정
<profiles>
    <profile>
        <id>integration-test</id>
        <build>
            <plugins>
                <plugin>
                    <groupId>org.apache.maven.plugins</groupId>
                    <artifactId>maven-failsafe-plugin</artifactId>
                    <executions>
                        <execution>
                            <goals>
                                <goal>integration-test</goal>
                                <goal>verify</goal>
                            </goals>
                        </execution>
                    </executions>
                    <configuration>
                        <includes>
                            <include>**/*IntegrationTest.java</include>
                            <include>**/*IT.java</include>
                        </includes>
                    </configuration>
                </plugin>
            </plugins>
        </build>
    </profile>
</profiles>
트러블슈팅 및 디버깅
실제 운영 환경에서 발생할 수 있는 문제들과 해결 방법을 정리했습니다.
일반적인 문제와 해결책
1. 컨테이너 시작 시간 지연
@Container
static PostgreSQLContainer<?> postgres = new PostgreSQLContainer<>("postgres:15")
        .withStartupTimeout(Duration.ofMinutes(2))
        .withConnectTimeoutSeconds(120)
        .waitingFor(Wait.forListeningPort())
        .withLogConsumer(new Slf4jLogConsumer(log));
2. 메모리 부족 문제
@Container
static GenericContainer<?> app = new GenericContainer<>("myapp:latest")
        .withCreateContainerCmdModifier(cmd ->
            cmd.getHostConfig().withMemory(512 * 1024 * 1024L)) // 512MB
        .withEnv("JAVA_OPTS", "-Xmx256m -Xms128m");
3. 네트워크 연결 문제
@Container
static Network sharedNetwork = Network.newNetwork();

@Container
static PostgreSQLContainer<?> postgres = new PostgreSQLContainer<>("postgres:15")
        .withNetwork(sharedNetwork)
        .withNetworkAliases("postgres");

@Container
static GenericContainer<?> app = new GenericContainer<>("myapp:latest")
        .withNetwork(sharedNetwork)
        .dependsOn(postgres);
고급 테스트 시나리오
복잡한 비즈니스 요구사항을 만족하는 고급 테스트 패턴들을 살펴보겠습니다.
분산 트랜잭션 테스트
@SpringBootTest
@Testcontainers
class DistributedTransactionTest {

    @Container
    static PostgreSQLContainer<?> orderDb = new PostgreSQLContainer<>("postgres:15")
            .withNetworkAliases("order-db");

    @Container
    static PostgreSQLContainer<?> paymentDb = new PostgreSQLContainer<>("postgres:15")
            .withNetworkAliases("payment-db");

    @Test
    @Transactional
    void shouldRollbackDistributedTransaction() {
        // Given: 주문과 결제 서비스가 분리된 환경
        Order order = createTestOrder();

        // When: 결제 실패 시나리오
        simulatePaymentFailure();

        // Then: 주문도 롤백되어야 함
        assertThrows(PaymentException.class,
                () -> orderService.processOrderWithPayment(order));

        // 주문이 생성되지 않았는지 확인
        assertThat(orderRepository.findById(order.getId())).isEmpty();
    }
}
이벤트 드리븐 아키텍처 테스트
@SpringBootTest
@Testcontainers
class EventDrivenArchitectureTest {

    @Container
    static RabbitMQContainer rabbitMQ = new RabbitMQContainer("rabbitmq:3-management")
            .withQueue("order.events")
            .withQueue("inventory.events");

    @Test
    void shouldProcessOrderEventChain() {
        // Given: 주문 이벤트 발생
        OrderCreatedEvent orderEvent = new OrderCreatedEvent(orderId, customerId, items);

        // When: 이벤트 발행
        eventPublisher.publishEvent(orderEvent);

        // Then: 연쇄적으로 처리되는 이벤트들 검증
        await().atMost(Duration.ofSeconds(10))
               .untilAsserted(() -> {
                   assertThat(inventoryService.isReserved(orderId)).isTrue();
                   assertThat(paymentService.isProcessed(orderId)).isTrue();
                   assertThat(orderService.getStatus(orderId))
                           .isEqualTo(OrderStatus.COMPLETED);
               });
    }
}
모니터링 및 로깅
테스트 실행 과정을 모니터링하고 디버깅하기 위한 로깅 전략입니다.
컨테이너 로그 수집
@SpringBootTest
@Testcontainers
class MonitoredIntegrationTest {

    private static final Logger log = LoggerFactory.getLogger(MonitoredIntegrationTest.class);

    @Container
    static PostgreSQLContainer<?> postgres = new PostgreSQLContainer<>("postgres:15")
            .withLogConsumer(new Slf4jLogConsumer(log).withPrefix("POSTGRES"))
            .withLogConsumer(outputFrame -> {
                if (outputFrame.getUtf8String().contains("ERROR")) {
                    log.error("Database error detected: {}", outputFrame.getUtf8String());
                }
            });

    @Test
    void shouldLogDatabaseOperations() {
        // 테스트 실행 중 데이터베이스 로그 자동 수집
    }
}
테스트 메트릭 수집
@Component
@TestConfiguration
public class TestMetricsCollector {

    private final MeterRegistry meterRegistry;
    private final Timer testExecutionTimer;

    public TestMetricsCollector(MeterRegistry meterRegistry) {
        this.meterRegistry = meterRegistry;
        this.testExecutionTimer = Timer.builder("test.execution.time")
                .description("Test execution time")
                .register(meterRegistry);
    }

    @EventListener
    public void handleTestExecution(TestExecutionEvent event) {
        testExecutionTimer.record(event.getDuration(), TimeUnit.MILLISECONDS);
    }
}
결론 및 모범 사례 요약
테스트컨테이너 스프링부트를 활용한 통합테스트 자동화는 현대적인 애플리케이션 개발에서 필수적인 요소가 되었습니다.
이 글에서 다룬 주요 내용들을 정리하면:
핵심 장점:
- 프로덕션 환경과 동일한 조건에서의 테스트
- Docker 설치 없이도 컨테이너 기반 테스트 가능
- CI/CD 파이프라인과의 완벽한 통합
- 복잡한 분산 시스템 테스트 지원
구현 시 주의사항:
- 컨테이너 재사용을 통한 성능 최적화
- 적절한 타임아웃 설정
- 메모리 사용량 모니터링
- 테스트 격리 보장
testcontainers spring boot 환경에서의 성공적인 통합 테스트는 애플리케이션의 품질을 크게 향상시키고,
배포 과정에서의 위험을 최소화할 수 있습니다.
지속적인 학습과 실습을 통해 더욱 견고한 테스트 환경을 구축해 나가시기 바랍니다.
참고 자료
'Spring & Spring Boot 실무 가이드' 카테고리의 다른 글
| Spring Cloud Stream으로 이벤트 드리븐 마이크로서비스 구축: 실무 완벽 가이드 (0) | 2025.06.20 |
|---|---|
| Spring Modulith로 모놀리식을 모듈화하기: 스프링 모듈리스 아키텍처 완벽 가이드 (0) | 2025.06.20 |
| Spring WebFlux 완벽 가이드: 리액티브 프로그래밍으로 대용량 트래픽 처리하기 (1) | 2025.06.10 |
| Event Sourcing과 CQRS 패턴 심화 구현 - Spring Boot로 고급 이벤트 드리븐 아키텍처 구축 (0) | 2025.06.07 |
| Event Sourcing과 CQRS 패턴 입문 - Axon Framework로 시작하는 이벤트 드리븐 개발 (0) | 2025.06.06 |


