
현대 웹 애플리케이션에서 높은 성능과 유연성을 동시에 확보하는 것은 매우 중요한 과제입니다.
OpenResty는 Nginx 웹 서버에 Lua 스크립팅 기능을 통합하여,
고성능 웹 애플리케이션과 실시간 HTTP API 서버를 구축할 수 있게 해주는 강력한 플랫폼입니다.
이전 시리즈에서 다룬 루아 코루틴과 비동기 프로그래밍의 지식을 바탕으로,
이번 글에서는 OpenResty를 활용한 실전 웹 서버 구축 방법을 완전히 마스터해보겠습니다.
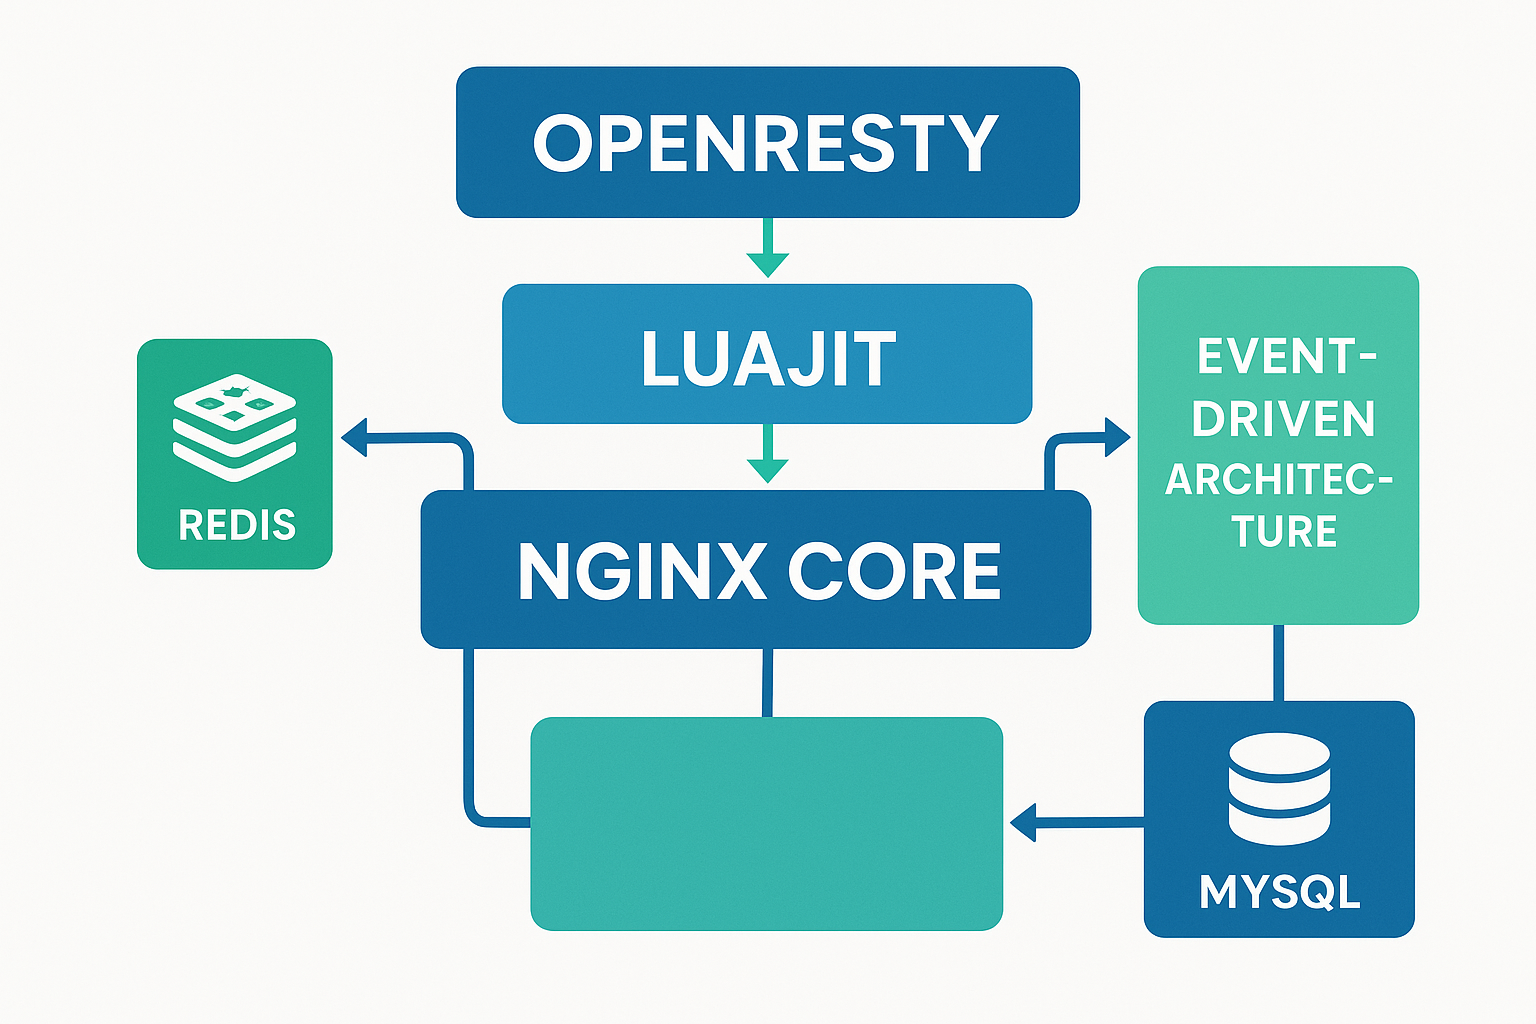
OpenResty란 무엇인가? - Nginx + Lua의 혁신적 결합
OpenResty는 중국의 개발자 Zhang Yichun(agentzh)이 개발한 웹 애플리케이션 서버로,
Nginx를 기반으로 하면서 LuaJIT를 통해 고성능 Lua 스크립팅 환경을 제공합니다.
일반적인 Nginx 정적 파일 서빙이나 리버스 프록시 기능을 넘어서,
동적 콘텐츠 생성과 복잡한 비즈니스 로직 처리가 가능한 완전한 웹 애플리케이션 플랫폼입니다.
OpenResty의 핵심 특징
1. 이벤트 기반 비동기 아키텍처
OpenResty는 Nginx의 이벤트 기반 아키텍처를 그대로 활용하여, 수천 개의 동시 연결을 효율적으로 처리할 수 있습니다.
전통적인 스레드 기반 웹 서버와 달리, 메모리 사용량이 적고 컨텍스트 스위칭 오버헤드가 거의 없어 매우 높은 성능을 보장합니다.
2. LuaJIT 통합으로 인한 고성능
LuaJIT는 Just-In-Time 컴파일을 통해 Lua 코드를 네이티브 머신 코드로 변환하여,
인터프리터 방식 대비 10-100배 빠른 실행 속도를 제공합니다.
이는 OpenResty가 다른 스크립팅 기반 웹 서버보다 훨씬 우수한 성능을 발휘할 수 있게 해주는 핵심 요소입니다.
3. 풍부한 내장 모듈과 생태계
OpenResty는 HTTP 클라이언트, Redis 클라이언트, MySQL 클라이언트, JSON 처리, 암호화 등 웹 개발에 필요한 다양한 모듈을 기본 제공합니다.
또한 활발한 오픈소스 커뮤니티를 통해 지속적으로 새로운 모듈과 기능이 추가되고 있습니다.
OpenResty 설치 및 개발 환경 구성하기
OpenResty 개발 환경을 구축하는 것은 매우 간단합니다.
다양한 운영체제에서 패키지 매니저를 통해 쉽게 설치할 수 있으며, 도커를 활용한 컨테이너 환경 구성도 가능합니다.
Ubuntu/Debian에서 OpenResty 설치
# OpenResty 공식 저장소 추가
sudo apt-get update
sudo apt-get install -y gnupg2 curl

curl -fsSL https://openresty.org/package/pubkey.gpg | sudo apt-key add -

echo "deb http://openresty.org/package/ubuntu $(lsb_release -sc) main" \
    | sudo tee /etc/apt/sources.list.d/openresty.list

# OpenResty 설치
sudo apt-get update
sudo apt-get install -y openresty
CentOS/RHEL에서 OpenResty 설치
# OpenResty 저장소 설정
sudo yum update -y
sudo yum install -y yum-utils

sudo yum-config-manager --add-repo https://openresty.org/package/centos/openresty.repo

# OpenResty 설치
sudo yum install -y openresty
Docker를 활용한 개발 환경 구성
FROM openresty/openresty:alpine

# 작업 디렉토리 설정
WORKDIR /usr/local/openresty

# 애플리케이션 파일 복사
COPY nginx.conf /usr/local/openresty/nginx/conf/
COPY lua/ /usr/local/openresty/lua/

# 포트 노출
EXPOSE 8080

# OpenResty 실행
CMD ["/usr/local/openresty/bin/openresty", "-g", "daemon off;"]
기본 설정 파일 구성
OpenResty의 핵심은 nginx.conf 설정 파일에 Lua 코드를 직접 임베드하거나 외부 Lua 파일을 로드하는 것입니다.
# nginx.conf
worker_processes auto;
error_log logs/error.log;

events {
    worker_connections 1024;
}

http {
    # Lua 패키지 경로 설정
    lua_package_path '/usr/local/openresty/lua/?.lua;;';
    lua_package_cpath '/usr/local/openresty/lua/?.so;;';

    # 공유 메모리 딕셔너리 설정
    lua_shared_dict my_cache 10m;

    server {
        listen 8080;
        server_name localhost;

        # 기본 Lua 핸들러
        location / {
            default_type 'text/html';
            content_by_lua_block {
                ngx.say("Hello from OpenResty!")
            }
        }
    }
}
Nginx와 Lua 통합의 핵심 개념 이해하기
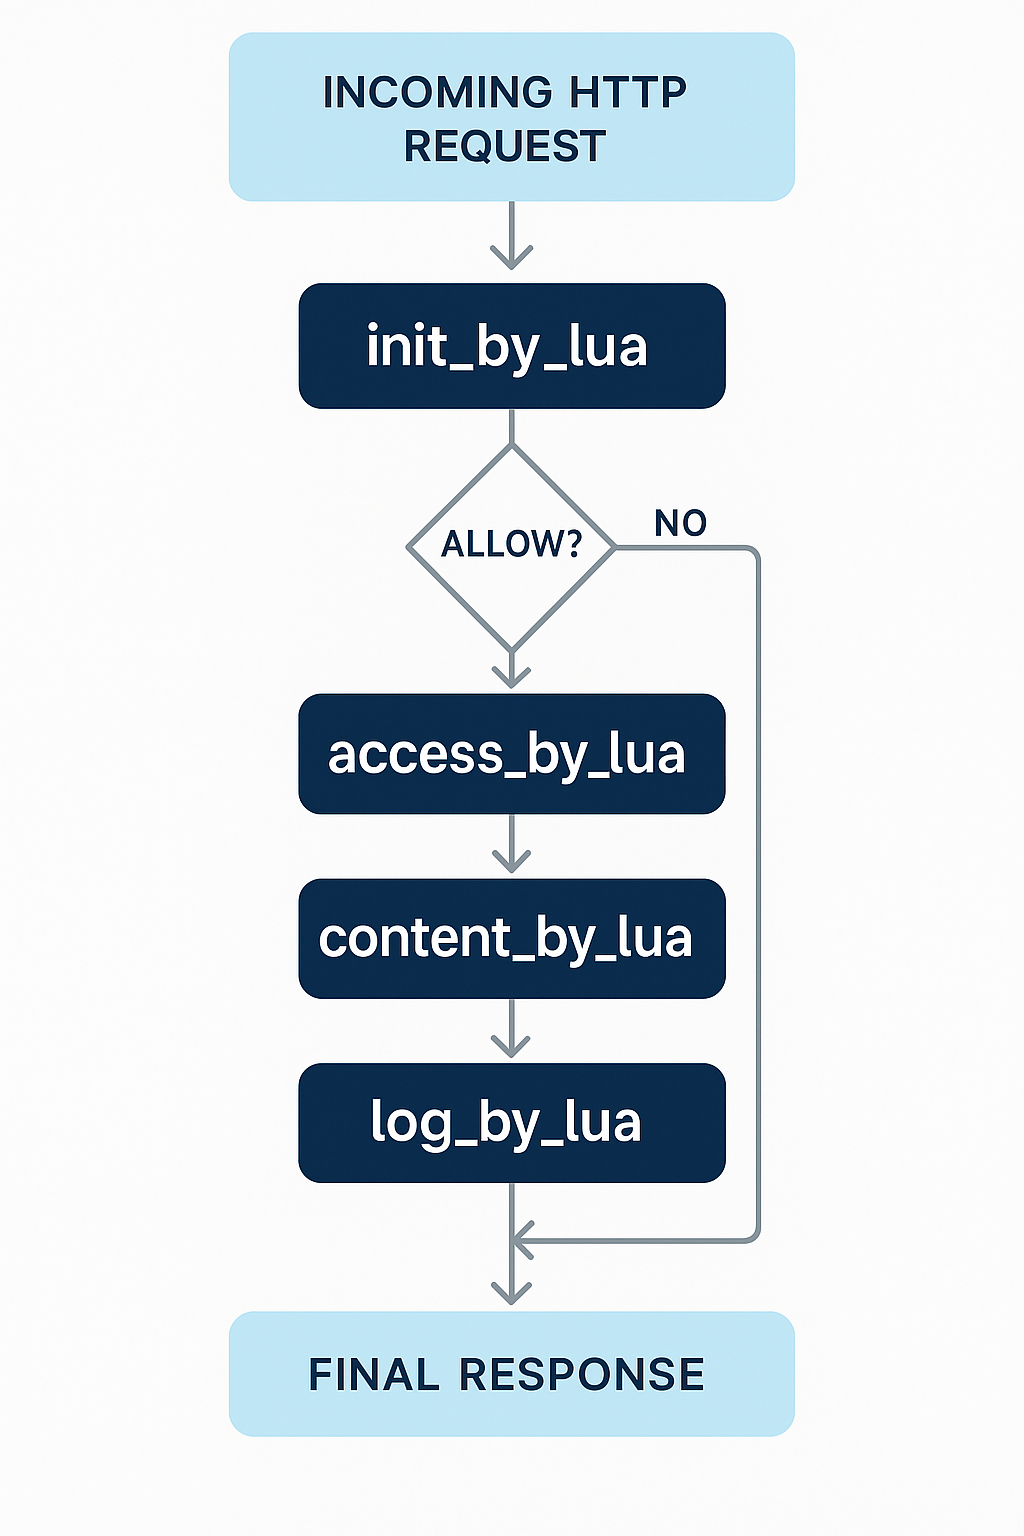
OpenResty에서 Nginx와 Lua의 통합은 여러 단계의 실행 지점(execution phases)을 통해 이루어집니다.
각 단계별로 적절한 Lua 디렉티브를 사용하여 요청 처리 과정을 세밀하게 제어할 수 있습니다.
OpenResty 실행 단계별 디렉티브
1. 초기화 단계
init_by_lua_block: 마스터 프로세스 시작 시 실행init_worker_by_lua_block: 워커 프로세스 시작 시 실행
2. 요청 처리 단계
ssl_certificate_by_lua_block: SSL 인증서 처리set_by_lua_block: 변수 설정rewrite_by_lua_block: URL 재작성access_by_lua_block: 접근 제어content_by_lua_block: 콘텐츠 생성log_by_lua_block: 로그 처리
실전 예제: 동적 라우팅 시스템 구현
http {
    # 라우팅 테이블을 위한 공유 메모리
    lua_shared_dict routes 1m;

    # 초기화 시 라우팅 규칙 로드
    init_by_lua_block {
        local routes = ngx.shared.routes
        routes:set("/api/users", "user_handler")
        routes:set("/api/products", "product_handler")
        routes:set("/api/orders", "order_handler")
    }

    server {
        listen 8080;

        location ~ ^/api/(.+)$ {
            access_by_lua_block {
                -- 인증 검사
                local auth_header = ngx.var.http_authorization
                if not auth_header then
                    ngx.status = 401
                    ngx.say("Unauthorized")
                    ngx.exit(401)
                end
            }

            content_by_lua_block {
                local uri = ngx.var.uri
                local routes = ngx.shared.routes
                local handler = routes:get(uri)

                if handler then
                    -- 핸들러 함수 동적 로드 및 실행
                    local handler_module = require(handler)
                    handler_module:process()
                else
                    ngx.status = 404
                    ngx.say("API endpoint not found")
                end
            }
        }
    }
}
Lua 코드 모듈화 및 구조화
실제 프로덕션 환경에서는 Lua 코드를 별도 파일로 분리하여 관리하는 것이 좋습니다.
-- /usr/local/openresty/lua/user_handler.lua
local _M = {}

function _M:process()
    local method = ngx.var.request_method

    if method == "GET" then
        self:get_users()
    elseif method == "POST" then
        self:create_user()
    elseif method == "PUT" then
        self:update_user()
    elseif method == "DELETE" then
        self:delete_user()
    else
        ngx.status = 405
        ngx.say("Method not allowed")
    end
end

function _M:get_users()
    -- 사용자 목록 조회 로직
    local users = {
        {id = 1, name = "John Doe", email = "john@example.com"},
        {id = 2, name = "Jane Smith", email = "jane@example.com"}
    }

    ngx.header.content_type = "application/json"
    ngx.say(require("cjson").encode(users))
end

function _M:create_user()
    -- 요청 본문 읽기
    ngx.req.read_body()
    local body = ngx.req.get_body_data()

    if not body then
        ngx.status = 400
        ngx.say("Request body required")
        return
    end

    local cjson = require("cjson")
    local user_data = cjson.decode(body)

    -- 사용자 생성 로직 (데이터베이스 저장 등)
    -- 여기서는 간단히 성공 응답만 반환
    ngx.status = 201
    ngx.header.content_type = "application/json"
    ngx.say(cjson.encode({
        success = true,
        message = "User created successfully",
        user = user_data
    }))
end

return _M
고성능 HTTP API 서버 구축 실전 가이드
OpenResty를 활용하여 실제 운영 환경에서 사용할 수 있는 고성능 HTTP API 서버를 구축해보겠습니다.
이 섹션에서는 데이터베이스 연동, 캐싱, 에러 처리, 로깅 등 실무에서 필요한 모든 요소를 포함한 완전한 API 서버를 만들어보겠습니다.
Redis 기반 캐싱 시스템 구현
-- /usr/local/openresty/lua/cache_manager.lua
local redis = require "resty.redis"
local cjson = require "cjson"

local _M = {}

function _M:new()
    local red = redis:new()
    red:set_timeout(1000) -- 1초 타임아웃

    local ok, err = red:connect("127.0.0.1", 6379)
    if not ok then
        ngx.log(ngx.ERR, "Redis connection failed: ", err)
        return nil
    end

    return {
        redis = red,
        expire_time = 3600  -- 1시간 캐시
    }
end

function _M:get(key)
    local cache = self:new()
    if not cache then
        return nil
    end

    local res, err = cache.redis:get(key)
    if not res or res == ngx.null then
        return nil
    end

    return cjson.decode(res)
end

function _M:set(key, value, expire)
    local cache = self:new()
    if not cache then
        return false
    end

    local json_value = cjson.encode(value)
    local expire_time = expire or cache.expire_time

    local ok, err = cache.redis:setex(key, expire_time, json_value)
    if not ok then
        ngx.log(ngx.ERR, "Redis setex failed: ", err)
        return false
    end

    return true
end

function _M:delete(key)
    local cache = self:new()
    if not cache then
        return false
    end

    local res, err = cache.redis:del(key)
    return res and res > 0
end

return _M
MySQL 데이터베이스 연동
-- /usr/local/openresty/lua/database.lua
local mysql = require "resty.mysql"
local cjson = require "cjson"

local _M = {}

function _M:new()
    local db, err = mysql:new()
    if not db then
        ngx.log(ngx.ERR, "MySQL connection failed: ", err)
        return nil
    end

    db:set_timeout(1000) -- 1초 타임아웃

    local ok, err, errno, sqlstate = db:connect{
        host = "127.0.0.1",
        port = 3306,
        database = "myapp",
        user = "myuser",
        password = "mypassword",
        charset = "utf8mb4",
        max_packet_size = 1024 * 1024,
    }

    if not ok then
        ngx.log(ngx.ERR, "MySQL connect failed: ", err, ", errno: ", errno, ", sqlstate: ", sqlstate)
        return nil
    end

    return db
end

function _M:query(sql, params)
    local db = self:new()
    if not db then
        return nil, "Database connection failed"
    end

    local res, err, errno, sqlstate = db:query(sql)
    if not res then
        ngx.log(ngx.ERR, "Query failed: ", err, ", errno: ", errno, ", sqlstate: ", sqlstate)
        return nil, err
    end

    -- 연결 풀에 반환
    local ok, err = db:set_keepalive(10000, 100)
    if not ok then
        ngx.log(ngx.WARN, "Failed to set keepalive: ", err)
    end

    return res, nil
end

function _M:insert(table_name, data)
    local fields = {}
    local values = {}
    local placeholders = {}

    for k, v in pairs(data) do
        table.insert(fields, k)
        table.insert(values, v)
        table.insert(placeholders, "?")
    end

    local sql = string.format(
        "INSERT INTO %s (%s) VALUES (%s)",
        table_name,
        table.concat(fields, ", "),
        table.concat(placeholders, ", ")
    )

    return self:query(sql, values)
end

function _M:select(table_name, conditions, limit)
    local sql = "SELECT * FROM " .. table_name

    if conditions and next(conditions) then
        local where_clauses = {}
        for k, v in pairs(conditions) do
            table.insert(where_clauses, k .. " = '" .. v .. "'")
        end
        sql = sql .. " WHERE " .. table.concat(where_clauses, " AND ")
    end

    if limit then
        sql = sql .. " LIMIT " .. limit
    end

    return self:query(sql)
end

return _M
완전한 REST API 핸들러 구현
-- /usr/local/openresty/lua/api_handler.lua
local cache_manager = require "cache_manager"
local database = require "database"
local cjson = require "cjson"

local _M = {}

function _M:response(status, data)
    ngx.status = status
    ngx.header.content_type = "application/json"

    local response = {
        status = status,
        data = data,
        timestamp = ngx.time()
    }

    ngx.say(cjson.encode(response))
end

function _M:error_response(status, message)
    self:response(status, {
        error = true,
        message = message
    })
end

function _M:get_users()
    -- 캐시에서 먼저 확인
    local cached_users = cache_manager:get("users:all")
    if cached_users then
        ngx.log(ngx.INFO, "Serving users from cache")
        return self:response(200, cached_users)
    end

    -- 데이터베이스에서 조회
    local db = database:new()
    local users, err = db:select("users", nil, 100)

    if not users then
        return self:error_response(500, "Database query failed: " .. (err or "unknown error"))
    end

    -- 캐시에 저장
    cache_manager:set("users:all", users, 300) -- 5분 캐시

    self:response(200, users)
end

function _M:create_user()
    -- 요청 본문 검증
    ngx.req.read_body()
    local body = ngx.req.get_body_data()

    if not body then
        return self:error_response(400, "Request body required")
    end

    local ok, user_data = pcall(cjson.decode, body)
    if not ok then
        return self:error_response(400, "Invalid JSON format")
    end

    -- 필수 필드 검증
    if not user_data.name or not user_data.email then
        return self:error_response(400, "Name and email are required")
    end

    -- 이메일 중복 검사
    local db = database:new()
    local existing_users, err = db:select("users", {email = user_data.email})

    if existing_users and #existing_users > 0 then
        return self:error_response(409, "Email already exists")
    end

    -- 새 사용자 생성
    user_data.created_at = ngx.time()
    local result, err = db:insert("users", user_data)

    if not result then
        return self:error_response(500, "Failed to create user: " .. (err or "unknown error"))
    end

    -- 캐시 무효화
    cache_manager:delete("users:all")

    user_data.id = result.insert_id
    self:response(201, user_data)
end

function _M:process()
    local method = ngx.var.request_method
    local uri = ngx.var.uri

    -- 라우팅 로직
    if uri == "/api/users" then
        if method == "GET" then
            self:get_users()
        elseif method == "POST" then
            self:create_user()
        else
            self:error_response(405, "Method not allowed")
        end
    else
        self:error_response(404, "Endpoint not found")
    end
end

return _M

실시간 데이터 처리와 WebSocket 구현
현대 웹 애플리케이션에서 실시간 통신은 필수적인 기능입니다.
OpenResty는 WebSocket 프로토콜을 완벽히 지원하여,
채팅 애플리케이션, 실시간 알림, 라이브 데이터 스트리밍 등을 구현할 수 있습니다.
WebSocket 서버 구현
# nginx.conf에 WebSocket 설정 추가
http {
    upstream websocket {
        server 127.0.0.1:8080;
    }

    map $http_upgrade $connection_upgrade {
        default upgrade;
        '' close;
    }

    server {
        listen 8080;

        location /ws {
            access_by_lua_block {
                -- WebSocket 연결 인증
                local token = ngx.var.arg_token
                if not token or token ~= "valid_token" then
                    ngx.status = 403
                    ngx.say("Forbidden")
                    ngx.exit(403)
                end
            }

            content_by_lua_block {
                local websocket = require "resty.websocket.server"

                local wb, err = websocket:new{
                    timeout = 5000,
                    max_payload_len = 65535,
                }

                if not wb then
                    ngx.log(ngx.ERR, "Failed to create WebSocket: ", err)
                    return
                end

                -- WebSocket 핸들러 로드
                local ws_handler = require "websocket_handler"
                ws_handler:handle_connection(wb)
            }
        }
    }
}
실시간 채팅 시스템 구현
-- /usr/local/openresty/lua/websocket_handler.lua
local cjson = require "cjson"
local redis = require "resty.redis"

local _M = {}

-- 활성 연결 관리를 위한 공유 딕셔너리
local connections = ngx.shared.connections or {}

function _M:handle_connection(wb)
    local client_id = self:generate_client_id()
    connections[client_id] = true

    ngx.log(ngx.INFO, "WebSocket client connected: ", client_id)

    -- 환영 메시지 전송
    local welcome_msg = {
        type = "welcome",
        client_id = client_id,
        message = "Connected to chat server"
    }

    local bytes, err = wb:send_text(cjson.encode(welcome_msg))
    if not bytes then
        ngx.log(ngx.ERR, "Failed to send welcome message: ", err)
        return
    end

    -- 메시지 수신 루프
    while true do
        local data, typ, err = wb:recv_frame()

        if not data then
            ngx.log(ngx.INFO, "WebSocket client disconnected: ", client_id)
            connections[client_id] = nil
            break
        end

        if typ == "close" then
            ngx.log(ngx.INFO, "WebSocket close frame received from: ", client_id)
            connections[client_id] = nil
            break
        elseif typ == "ping" then
            -- Pong 응답
            wb:send_pong(data)
        elseif typ == "text" then
            -- 텍스트 메시지 처리
            self:handle_message(wb, client_id, data)
        end
    end

    wb:send_close()
end

function _M:handle_message(wb, client_id, data)
    local ok, message = pcall(cjson.decode, data)
    if not ok then
        local error_msg = {
            type = "error",
            message = "Invalid JSON format"
        }
        wb:send_text(cjson.encode(error_msg))
        return
    end

    if message.type == "chat" then
        self:broadcast_chat_message(client_id, message)
    elseif message.type == "typing" then
        self:broadcast_typing_status(client_id, message)
    else
        local error_msg = {
            type = "error",
            message = "Unknown message type"
        }
        wb:send_text(cjson.encode(error_msg))
    end
end

function _M:broadcast_chat_message(sender_id, message)
    -- 채팅 메시지를 Redis에 저장
    local red = redis:new()
    red:set_timeout(1000)

    local ok, err = red:connect("127.0.0.1", 6379)
    if ok then
        local chat_data = {
            sender_id = sender_id,
            message = message.content,
            timestamp = ngx.time(),
            room = message.room or "general"
        }

        -- Redis 리스트에 메시지 저장
        red:lpush("chat_history:" .. chat_data.room, cjson.encode(chat_data))
        red:ltrim("chat_history:" .. chat_data.room, 0, 99) -- 최근 100개 메시지만 보관

        -- Redis Pub/Sub으로 메시지 브로드캐스트
        red:publish("chat_channel:" .. chat_data.room, cjson.encode(chat_data))
    end
end

function _M:generate_client_id()
    local random = math.random(100000, 999999)
    return "client_" .. random .. "_" .. ngx.time()
end

-- Redis Pub/Sub 구독자 (별도 워커에서 실행)
function _M:start_subscriber()
    local red = redis:new()
    red:set_timeout(1000)

    local ok, err = red:connect("127.0.0.1", 6379)
    if not ok then
        ngx.log(ngx.ERR, "Redis subscriber connection failed: ", err)
        return
    end

    red:subscribe("chat_channel:general")

    while true do
        local res, err = red:read_reply()
        if not res then
            if err ~= "timeout" then
                ngx.log(ngx.ERR, "Redis read_reply failed: ", err)
                break
            end
        else
            if res[1] == "message" then
                local channel = res[2]
                local message = res[3]

                -- 모든 연결된 클라이언트에게 메시지 전송
                self:broadcast_to_all_clients(message)
            end
        end
    end
end

return _M
실시간 모니터링 대시보드
-- /usr/local/openresty/lua/monitoring.lua
local _M = {}

function _M:get_system_stats()
    local stats = {
        timestamp = ngx.time(),
        server_info = {
            nginx_version = ngx.var.nginx_version,
            openresty_version = ngx.config.subsystem,
            worker_pid = ngx.worker.pid(),
            worker_count = ngx.worker.count()
        },
        memory_usage = self:get_memory_usage(),
        connection_stats = self:get_connection_stats(),
        cache_stats = self:get_cache_stats()
    }

    return stats
end

function _M:get_memory_usage()
    -- Lua 메모리 사용량 조회
    local lua_memory = collectgarbage("count") * 1024 -- bytes

    return {
        lua_memory = lua_memory,
        shared_dict_usage = self:get_shared_dict_usage()
    }
end

function _M:get_shared_dict_usage()
    local dict_stats = {}

    -- 각 공유 딕셔너리의 사용량 조회
    local dicts = {"my_cache", "connections", "rate_limit"}

    for _, dict_name in ipairs(dicts) do
        local dict = ngx.shared[dict_name]
        if dict then
            dict_stats[dict_name] = {
                capacity = dict:capacity(),
                free_space = dict:free_space()
            }
        end
    end

    return dict_stats
end

function _M:start_real_time_monitoring()
    ngx.timer.every(5, function(premature)
        if premature then
            return
        end

        local stats = self:get_system_stats()

        -- WebSocket을 통해 모니터링 데이터 전송
        local red = redis:new()
        red:set_timeout(1000)

        local ok, err = red:connect("127.0.0.1", 6379)
        if ok then
            red:publish("monitoring_channel", cjson.encode(stats))
        end
    end)
end

return _M
성능 최적화 및 보안 강화 전략
프로덕션 환경에서 OpenResty 기반 웹 서버를 운영할 때는 성능 최적화와 보안 강화가 매우 중요합니다.
이 섹션에서는 실제 대규모 트래픽을 처리할 수 있는 고성능 설정과 다양한 보안 위협으로부터 시스템을 보호하는 방법을 다루겠습니다.
연결 풀링과 메모리 최적화
OpenResty에서 가장 중요한 성능 최적화 요소 중 하나는 효율적인 연결 풀링입니다.
데이터베이스, Redis, 외부 HTTP 서비스와의 연결을 재사용함으로써 연결 생성 오버헤드를 크게 줄일 수 있습니다.
-- /usr/local/openresty/lua/connection_pool.lua
local mysql = require "resty.mysql"
local redis = require "resty.redis"

local _M = {}

-- MySQL 연결 풀 설정
function _M:get_mysql_connection()
    local db, err = mysql:new()
    if not db then
        return nil, err
    end

    db:set_timeout(1000)

    local ok, err, errno, sqlstate = db:connect{
        host = os.getenv("MYSQL_HOST") or "127.0.0.1",
        port = tonumber(os.getenv("MYSQL_PORT")) or 3306,
        database = os.getenv("MYSQL_DATABASE") or "myapp",
        user = os.getenv("MYSQL_USER") or "root",
        password = os.getenv("MYSQL_PASSWORD") or "",
        charset = "utf8mb4",
        max_packet_size = 1024 * 1024,
        pool = "mysql_pool",          -- 연결 풀 이름
        pool_size = 50,               -- 풀 크기
        backlog = 100                 -- 대기 큐 크기
    }

    if not ok then
        return nil, "MySQL connection failed: " .. err
    end

    return db
end

-- Redis 연결 풀 설정
function _M:get_redis_connection()
    local red = redis:new()
    red:set_timeout(1000)

    local ok, err = red:connect("127.0.0.1", 6379, {
        pool = "redis_pool",
        pool_size = 100,
        backlog = 200
    })

    if not ok then
        return nil, "Redis connection failed: " .. err
    end

    return red
end

-- 연결 반환 (keepalive 설정)
function _M:close_mysql(db)
    if not db then
        return
    end

    -- 10초 keepalive, 최대 100개 연결 풀
    local ok, err = db:set_keepalive(10000, 100)
    if not ok then
        ngx.log(ngx.WARN, "Failed to set MySQL keepalive: ", err)
    end
end

function _M:close_redis(red)
    if not red then
        return
    end

    -- 30초 keepalive, 최대 200개 연결 풀
    local ok, err = red:set_keepalive(30000, 200)
    if not ok then
        ngx.log(ngx.WARN, "Failed to set Redis keepalive: ", err)
    end
end

return _M
Lua 코드 최적화 및 메모리 관리
-- /usr/local/openresty/lua/performance_utils.lua
local _M = {}

-- 테이블 풀링으로 GC 압박 감소
local table_pool = {}
local pool_size = 0
local max_pool_size = 1000

function _M:get_table()
    if pool_size > 0 then
        pool_size = pool_size - 1
        local t = table_pool[pool_size + 1]
        table_pool[pool_size + 1] = nil
        return t
    else
        return {}
    end
end

function _M:return_table(t)
    if pool_size < max_pool_size then
        -- 테이블 초기화
        for k, v in pairs(t) do
            t[k] = nil
        end

        pool_size = pool_size + 1
        table_pool[pool_size] = t
    end
end

-- 문자열 연산 최적화
function _M:fast_string_concat(parts)
    local buffer = self:get_table()

    for i, part in ipairs(parts) do
        buffer[i] = tostring(part)
    end

    local result = table.concat(buffer)
    self:return_table(buffer)

    return result
end

-- JSON 파싱 캐시
local json_cache = {}
local json_cache_size = 0
local max_json_cache = 500

function _M:cached_json_decode(json_str)
    local cached = json_cache[json_str]
    if cached then
        return cached
    end

    local cjson = require "cjson"
    local decoded = cjson.decode(json_str)

    if json_cache_size < max_json_cache then
        json_cache[json_str] = decoded
        json_cache_size = json_cache_size + 1
    end

    return decoded
end

return _M
레이트 리미팅과 DDoS 방어
# nginx.conf에 레이트 리미팅 설정
http {
    # 공유 메모리 존 설정
    lua_shared_dict rate_limit 100m;
    lua_shared_dict ip_blacklist 10m;

    # 레이트 리미팅 초기화
    init_by_lua_block {
        local rate_limit = ngx.shared.rate_limit
        local ip_blacklist = ngx.shared.ip_blacklist

        -- 기본 설정값
        rate_limit:set("default_rate", 100)      -- 분당 100 요청
        rate_limit:set("api_rate", 1000)         -- API는 분당 1000 요청
        rate_limit:set("burst_size", 50)         -- 버스트 허용량
    }

    server {
        listen 8080;

        # DDoS 방어를 위한 접근 제어
        access_by_lua_block {
            local ddos_protection = require "ddos_protection"
            local allowed, reason = ddos_protection:check_request()

            if not allowed then
                ngx.status = 429
                ngx.header["Retry-After"] = "60"
                ngx.say("Rate limit exceeded: " .. reason)
                ngx.exit(429)
            end
        }

        location /api/ {
            access_by_lua_block {
                local rate_limiter = require "rate_limiter"
                local allowed = rate_limiter:is_allowed("api", ngx.var.remote_addr)

                if not allowed then
                    ngx.status = 429
                    ngx.header["X-RateLimit-Limit"] = "1000"
                    ngx.header["X-RateLimit-Remaining"] = "0"
                    ngx.say("API rate limit exceeded")
                    ngx.exit(429)
                end
            }

            content_by_lua_block {
                local api_handler = require "api_handler"
                api_handler:process()
            }
        }
    }
}
-- /usr/local/openresty/lua/ddos_protection.lua
local _M = {}
function _M:check_request()
local ip = ngx.var.remote_addr
local user_agent = ngx.var.http_user_agent or ""
local uri = ngx.var.uri
-- IP 블랙리스트 확인
local ip_blacklist = ngx.shared.ip_blacklist
local blacklisted = ip_blacklist:get(ip)
if blacklisted then
return false, "IP blacklisted"
end
-- 의심스러운 User-Agent 차단
if self:is_suspicious_user_agent(user_agent) then
ip_blacklist:set(ip, true, 3600) -- 1시간 차단
return false, "Suspicious user agent"
end
-- 요청 패턴 분석
local pattern_score = self:analyze_request_pattern(ip, uri)
if pattern_score > 80 then
ip_blacklist:set(ip, true, 1800) -- 30분 차단
return false, "Suspicious request pattern"
end
return true, "OK"
end
function _M:is_suspicious_user_agent(user_agent)
local suspicious_patterns = {
"bot", "crawler", "spider", "scraper",
"curl", "wget", "python", "java",
"scanner", "flood", "attack"
}
local lower_ua = string.lower(user_agent)
for _, pattern in ipairs(suspicious_patterns) do
if string.find(lower_ua, pattern) then
return true
end
end
return false
end
function _M:analyze_request_pattern(ip, uri)
local rate_limit = ngx.shared.rate_limit
local current_time = ngx.time()
local window_key = ip .. ":" .. math.floor(current_time / 60) -- 1분 윈도우
local request_count = rate_limit:get(window_key) or 0
rate_limit:set(window_key, request_count + 1, 60)
-- 점수 계산 로직
local score = 0
-- 요청 빈도 점수 (분당 100회 이상은 의심)
if request_count > 100 then
score = score + 30
elseif request_count > 50 then
score = score + 15
end
-- 경로 패턴 점수
if string.match(uri, "%.php$") or string.match(uri, "wp%-admin") then
score = score + 40 -- WordPress 공격 시도
end
if string.match(uri, "%.env$") or string.match(uri, "config") then
score = score + 50 -- 설정 파일 접근 시도
end
return score
end
return _MSSL/TLS 보안 설정
# SSL 최적화 설정
http {
    # SSL 세션 캐시 설정
    ssl_session_cache shared:SSL:50m;
    ssl_session_timeout 1d;
    ssl_session_tickets off;

    # 최신 SSL 프로토콜만 허용
    ssl_protocols TLSv1.2 TLSv1.3;
    ssl_ciphers ECDHE-ECDSA-AES128-GCM-SHA256:ECDHE-RSA-AES128-GCM-SHA256:ECDHE-ECDSA-AES256-GCM-SHA384:ECDHE-RSA-AES256-GCM-SHA384;
    ssl_prefer_server_ciphers off;

    # HSTS 설정
    add_header Strict-Transport-Security "max-age=63072000" always;

    server {
        listen 443 ssl http2;
        server_name your-domain.com;

        # SSL 인증서 설정
        ssl_certificate /path/to/cert.pem;
        ssl_certificate_key /path/to/private.key;

        # 보안 헤더 추가
        add_header X-Frame-Options DENY;
        add_header X-Content-Type-Options nosniff;
        add_header X-XSS-Protection "1; mode=block";
        add_header Referrer-Policy "strict-origin-when-cross-origin";

        # CSP 헤더
        add_header Content-Security-Policy "default-src 'self'; script-src 'self' 'unsafe-inline'; style-src 'self' 'unsafe-inline'";

        location / {
            content_by_lua_block {
                local security = require "security_middleware"
                security:validate_request()

                local app = require "main_app"
                app:handle_request()
            }
        }
    }
}
입력 검증 및 XSS 방어
-- /usr/local/openresty/lua/security_middleware.lua
local _M = {}

function _M:validate_request()
    -- SQL Injection 방어
    self:check_sql_injection()

    -- XSS 방어
    self:sanitize_input()

    -- CSRF 토큰 검증
    self:verify_csrf_token()
end

function _M:check_sql_injection()
    local args = ngx.req.get_uri_args()
    local sql_patterns = {
        "union%s+select", "drop%s+table", "insert%s+into",
        "delete%s+from", "update%s+.*set", "exec%s*%(",
        "script%s*:", "javascript%s*:", "vbscript%s*:"
    }

    for key, value in pairs(args) do
        local lower_value = string.lower(tostring(value))
        for _, pattern in ipairs(sql_patterns) do
            if string.match(lower_value, pattern) then
                ngx.log(ngx.WARN, "SQL injection attempt detected: ", value)
                ngx.status = 400
                ngx.say("Invalid request")
                ngx.exit(400)
            end
        end
    end
end

function _M:sanitize_input()
    -- POST 데이터 검사
    ngx.req.read_body()
    local body = ngx.req.get_body_data()

    if body then
        -- XSS 패턴 검사
        local xss_patterns = {
            "<script[^>]*>", "</script>", "javascript:", "vbscript:",
            "onload=", "onerror=", "onclick=", "onmouseover="
        }

        local lower_body = string.lower(body)
        for _, pattern in ipairs(xss_patterns) do
            if string.match(lower_body, pattern) then
                ngx.log(ngx.WARN, "XSS attempt detected in body")
                ngx.status = 400
                ngx.say("Invalid request content")
                ngx.exit(400)
            end
        end
    end
end

function _M:verify_csrf_token()
    local method = ngx.var.request_method

    -- POST, PUT, DELETE 요청에 대해서만 CSRF 토큰 검증
    if method == "POST" or method == "PUT" or method == "DELETE" then
        local token = ngx.var.http_x_csrf_token or ngx.var.cookie_csrf_token

        if not token then
            ngx.status = 403
            ngx.say("CSRF token required")
            ngx.exit(403)
        end

        -- 토큰 유효성 검증 (실제로는 더 복잡한 로직 필요)
        local expected_token = self:generate_csrf_token()
        if token ~= expected_token then
            ngx.log(ngx.WARN, "Invalid CSRF token: ", token)
            ngx.status = 403
            ngx.say("Invalid CSRF token")
            ngx.exit(403)
        end
    end
end

function _M:generate_csrf_token()
    -- 간단한 CSRF 토큰 생성 (실제로는 더 안전한 방법 사용)
    local secret = "your-secret-key"
    local timestamp = ngx.time()
    local session_id = ngx.var.cookie_session_id or "anonymous"

    return ngx.encode_base64(ngx.hmac_sha1(secret, session_id .. timestamp))
end

return _M
모니터링과 로깅 전략
운영 환경에서 OpenResty 애플리케이션의 안정성과 성능을 보장하려면 효과적인 모니터링과 로깅 시스템이 필수입니다.
이 섹션에서는 실시간 메트릭 수집, 구조화된 로깅, 알림 시스템 구축 방법을 다루겠습니다.
커스텀 메트릭 수집 시스템
-- /usr/local/openresty/lua/metrics_collector.lua
local _M = {}

-- 메트릭 저장을 위한 공유 딕셔너리
local metrics = ngx.shared.metrics or ngx.shared.dict

function _M:init()
    -- 초기 메트릭 설정
    local current_time = ngx.time()
    metrics:set("server_start_time", current_time)
    metrics:set("total_requests", 0)
    metrics:set("error_count", 0)
    metrics:set("response_time_sum", 0)
end

function _M:increment_counter(name, value)
    value = value or 1
    local current = metrics:get(name) or 0
    metrics:set(name, current + value)
end

function _M:record_response_time(time_ms)
    -- 응답 시간 기록
    self:increment_counter("response_time_sum", time_ms)
    self:increment_counter("response_time_count", 1)

    -- 히스토그램 버킷 업데이트
    if time_ms < 100 then
        self:increment_counter("response_time_bucket_100")
    elseif time_ms < 500 then
        self:increment_counter("response_time_bucket_500")
    elseif time_ms < 1000 then
        self:increment_counter("response_time_bucket_1000")
    else
        self:increment_counter("response_time_bucket_slow")
    end
end

function _M:get_metrics()
    local total_requests = metrics:get("total_requests") or 0
    local error_count = metrics:get("error_count") or 0
    local response_time_sum = metrics:get("response_time_sum") or 0
    local response_time_count = metrics:get("response_time_count") or 0

    local avg_response_time = 0
    if response_time_count > 0 then
        avg_response_time = response_time_sum / response_time_count
    end

    local error_rate = 0
    if total_requests > 0 then
        error_rate = (error_count / total_requests) * 100
    end

    return {
        total_requests = total_requests,
        error_count = error_count,
        error_rate = error_rate,
        avg_response_time = avg_response_time,
        uptime = ngx.time() - (metrics:get("server_start_time") or ngx.time()),
        memory_usage = collectgarbage("count") * 1024,
        histograms = {
            response_time_100 = metrics:get("response_time_bucket_100") or 0,
            response_time_500 = metrics:get("response_time_bucket_500") or 0,
            response_time_1000 = metrics:get("response_time_bucket_1000") or 0,
            response_time_slow = metrics:get("response_time_bucket_slow") or 0
        }
    }
end

-- Prometheus 형식으로 메트릭 출력
function _M:export_prometheus()
    local metrics_data = self:get_metrics()
    local output = {}

    table.insert(output, "# HELP http_requests_total Total number of HTTP requests")
    table.insert(output, "# TYPE http_requests_total counter")
    table.insert(output, "http_requests_total " .. metrics_data.total_requests)

    table.insert(output, "# HELP http_request_duration_seconds HTTP request duration")
    table.insert(output, "# TYPE http_request_duration_seconds histogram")
    table.insert(output, "http_request_duration_seconds_bucket{le=\"0.1\"} " .. metrics_data.histograms.response_time_100)
    table.insert(output, "http_request_duration_seconds_bucket{le=\"0.5\"} " .. metrics_data.histograms.response_time_500)
    table.insert(output, "http_request_duration_seconds_bucket{le=\"1.0\"} " .. metrics_data.histograms.response_time_1000)
    table.insert(output, "http_request_duration_seconds_bucket{le=\"+Inf\"} " .. metrics_data.total_requests)

    table.insert(output, "# HELP process_uptime_seconds Process uptime")
    table.insert(output, "# TYPE process_uptime_seconds counter")
    table.insert(output, "process_uptime_seconds " .. metrics_data.uptime)

    return table.concat(output, "\n")
end

return _M
구조화된 로깅 시스템
-- /usr/local/openresty/lua/structured_logger.lua
local cjson = require "cjson"
local _M = {}

-- 로그 레벨 정의
local LOG_LEVELS = {
    DEBUG = 1,
    INFO = 2,
    WARN = 3,
    ERROR = 4,
    FATAL = 5
}

function _M:new()
    return {
        level = LOG_LEVELS.INFO,
        context = {}
    }
end

function _M:set_context(key, value)
    self.context[key] = value
end

function _M:log(level, message, extra_data)
    if LOG_LEVELS[level] < self.level then
        return
    end

    local log_entry = {
        timestamp = ngx.utctime(),
        level = level,
        message = message,
        request_id = ngx.var.request_id or self:generate_request_id(),
        remote_addr = ngx.var.remote_addr,
        uri = ngx.var.uri,
        method = ngx.var.request_method,
        user_agent = ngx.var.http_user_agent,
        response_time = (ngx.now() - ngx.req.start_time()) * 1000,
        worker_pid = ngx.worker.pid(),
        context = self.context
    }

    -- 추가 데이터 병합
    if extra_data then
        for k, v in pairs(extra_data) do
            log_entry[k] = v
        end
    end

    -- JSON 형태로 로그 출력
    local log_json = cjson.encode(log_entry)

    if level == "ERROR" or level == "FATAL" then
        ngx.log(ngx.ERR, log_json)
    elseif level == "WARN" then
        ngx.log(ngx.WARN, log_json)
    else
        ngx.log(ngx.INFO, log_json)
    end

    -- 외부 로그 수집 시스템으로 전송 (선택적)
    self:send_to_external_logger(log_entry)
end

function _M:info(message, extra_data)
    self:log("INFO", message, extra_data)
end

function _M:warn(message, extra_data)
    self:log("WARN", message, extra_data)
end

function _M:error(message, extra_data)
    self:log("ERROR", message, extra_data)
end

function _M:debug(message, extra_data)
    self:log("DEBUG", message, extra_data)
end

function _M:generate_request_id()
    local random1 = math.random(10000, 99999)
    local random2 = math.random(10000, 99999)
    return string.format("%d-%d-%d", ngx.time(), random1, random2)
end

function _M:send_to_external_logger(log_entry)
    -- ELK Stack, Fluentd, 또는 다른 로그 수집 시스템으로 전송
    local httpc = require "resty.http"
    local client = httpc.new()

    -- 비동기 전송 (에러가 발생해도 메인 플로우에 영향 없음)
    ngx.timer.at(0, function()
        local res, err = client:request_uri("http://logstash:5000/logs", {
            method = "POST",
            body = cjson.encode(log_entry),
            headers = {
                ["Content-Type"] = "application/json"
            },
            timeout = 1000
        })

        if not res then
            -- 로그 전송 실패는 별도 처리하지 않음 (무한 루프 방지)
        end
    end)
end

return _M
실시간 알림 시스템
-- /usr/local/openresty/lua/alert_manager.lua
local _M = {}

function _M:check_health_status()
    local metrics = require "metrics_collector"
    local logger = require "structured_logger"

    local current_metrics = metrics:get_metrics()

    -- 에러율 체크
    if current_metrics.error_rate > 5 then -- 5% 이상
        self:send_alert("HIGH_ERROR_RATE", {
            error_rate = current_metrics.error_rate,
            total_requests = current_metrics.total_requests,
            error_count = current_metrics.error_count
        })
    end

    -- 응답 시간 체크
    if current_metrics.avg_response_time > 2000 then -- 2초 이상
        self:send_alert("SLOW_RESPONSE", {
            avg_response_time = current_metrics.avg_response_time,
            slow_requests = current_metrics.histograms.response_time_slow
        })
    end

    -- 메모리 사용량 체크
    if current_metrics.memory_usage > 500 * 1024 * 1024 then -- 500MB 이상
        self:send_alert("HIGH_MEMORY_USAGE", {
            memory_usage = current_metrics.memory_usage,
            memory_usage_mb = math.floor(current_metrics.memory_usage / 1024 / 1024)
        })
    end
end

function _M:send_alert(alert_type, data)
    local alert_data = {
        alert_type = alert_type,
        timestamp = ngx.utctime(),
        server_info = {
            hostname = os.getenv("HOSTNAME") or "unknown",
            worker_pid = ngx.worker.pid()
        },
        data = data
    }

    -- Slack 알림 전송
    self:send_to_slack(alert_data)

    -- 이메일 알림 전송
    self:send_email_alert(alert_data)

    -- 내부 로그 기록
    local logger = require "structured_logger"
    logger:error("System alert triggered", alert_data)
end

function _M:send_to_slack(alert_data)
    local httpc = require "resty.http"
    local cjson = require "cjson"

    local webhook_url = os.getenv("SLACK_WEBHOOK_URL")
    if not webhook_url then
        return
    end

    local message = {
        text = "🚨 OpenResty Alert: " .. alert_data.alert_type,
        attachments = {
            {
                color = "danger",
                fields = {
                    {
                        title = "Server",
                        value = alert_data.server_info.hostname,
                        short = true
                    },
                    {
                        title = "Worker PID",
                        value = alert_data.server_info.worker_pid,
                        short = true
                    },
                    {
                        title = "Timestamp",
                        value = alert_data.timestamp,
                        short = false
                    }
                }
            }
        }
    }

    -- 알림 타입별 상세 정보 추가
    if alert_data.alert_type == "HIGH_ERROR_RATE" then
        table.insert(message.attachments[1].fields, {
            title = "Error Rate",
            value = string.format("%.2f%%", alert_data.data.error_rate),
            short = true
        })
    elseif alert_data.alert_type == "SLOW_RESPONSE" then
        table.insert(message.attachments[1].fields, {
            title = "Average Response Time",
            value = string.format("%.0f ms", alert_data.data.avg_response_time),
            short = true
        })
    end

    ngx.timer.at(0, function()
        local client = httpc.new()
        local res, err = client:request_uri(webhook_url, {
            method = "POST",
            body = cjson.encode(message),
            headers = {
                ["Content-Type"] = "application/json"
            },
            timeout = 5000
        })
    end)
end

return _M
실제 프로젝트 배포 및 운영 가이드
개발 환경에서 완성된 OpenResty 애플리케이션을 실제 프로덕션 환경에 배포하고 운영하는 것은 별도의 전문 지식이 필요합니다.
이 섹션에서는 Docker 컨테이너화, CI/CD 파이프라인 구축, 로드밸런싱, 무중단 배포 등 실무에서 필요한 모든 운영 기법을 다루겠습니다.
Docker 기반 프로덕션 환경 구축
# Dockerfile
FROM openresty/openresty:1.21.4.1-alpine

# 필요한 패키지 설치
RUN apk add --no-cache \
    curl \
    tzdata \
    logrotate

# 시간대 설정
ENV TZ=Asia/Seoul
RUN ln -snf /usr/share/zoneinfo/$TZ /etc/localtime && echo $TZ > /etc/timezone

# 애플리케이션 디렉토리 생성
WORKDIR /usr/local/openresty

# Lua 모듈 및 설정 파일 복사
COPY conf/nginx.conf /usr/local/openresty/nginx/conf/
COPY lua/ /usr/local/openresty/lua/
COPY static/ /usr/local/openresty/nginx/html/

# 로그 디렉토리 생성
RUN mkdir -p /var/log/nginx /var/log/openresty

# 헬스체크 스크립트 추가
COPY scripts/healthcheck.sh /usr/local/bin/
RUN chmod +x /usr/local/bin/healthcheck.sh

# 환경변수 설정
ENV NGINX_WORKER_PROCESSES=auto
ENV NGINX_WORKER_CONNECTIONS=1024
ENV REDIS_HOST=redis
ENV MYSQL_HOST=mysql

# 포트 노출
EXPOSE 8080 8443

# 헬스체크 설정
HEALTHCHECK --interval=30s --timeout=10s --start-period=5s --retries=3 \
    CMD /usr/local/bin/healthcheck.sh

# OpenResty 실행
CMD ["/usr/local/openresty/bin/openresty", "-g", "daemon off;"]
Docker Compose 기반 전체 스택 구성
# docker-compose.yml
version: '3.8'

services:
  app:
    build: .
    ports:
      - "80:8080"
      - "443:8443"
    environment:
      - REDIS_HOST=redis
      - MYSQL_HOST=mysql
      - MYSQL_DATABASE=openresty_app
      - MYSQL_USER=app_user
      - MYSQL_PASSWORD=secure_password
      - LOG_LEVEL=INFO
    volumes:
      - ./logs:/var/log/nginx
      - ./conf/ssl:/etc/ssl/certs
    depends_on:
      - redis
      - mysql
    networks:
      - app-network
    restart: unless-stopped
    deploy:
      resources:
        limits:
          memory: 512M
          cpus: '1.0'
        reservations:
          memory: 256M
          cpus: '0.5'

  redis:
    image: redis:7.0-alpine
    command: redis-server --appendonly yes --maxmemory 256mb --maxmemory-policy allkeys-lru
    volumes:
      - redis-data:/data
    networks:
      - app-network
    restart: unless-stopped
    healthcheck:
      test: ["CMD", "redis-cli", "ping"]
      interval: 30s
      timeout: 10s
      retries: 3

  mysql:
    image: mysql:8.0
    environment:
      - MYSQL_ROOT_PASSWORD=root_password
      - MYSQL_DATABASE=openresty_app
      - MYSQL_USER=app_user
      - MYSQL_PASSWORD=secure_password
    volumes:
      - mysql-data:/var/lib/mysql
      - ./sql/init.sql:/docker-entrypoint-initdb.d/init.sql
    networks:
      - app-network
    restart: unless-stopped
    healthcheck:
      test: ["CMD", "mysqladmin", "ping", "-h", "localhost"]
      interval: 30s
      timeout: 10s
      retries: 3

  nginx-lb:
    image: nginx:alpine
    ports:
      - "8080:80"
    volumes:
      - ./nginx-lb.conf:/etc/nginx/nginx.conf
    depends_on:
      - app
    networks:
      - app-network
    restart: unless-stopped

  prometheus:
    image: prom/prometheus:latest
    ports:
      - "9090:9090"
    volumes:
      - ./monitoring/prometheus.yml:/etc/prometheus/prometheus.yml
      - prometheus-data:/prometheus
    networks:
      - app-network
    restart: unless-stopped

  grafana:
    image: grafana/grafana:latest
    ports:
      - "3000:3000"
    environment:
      - GF_SECURITY_ADMIN_PASSWORD=admin
    volumes:
      - grafana-data:/var/lib/grafana
      - ./monitoring/grafana-dashboards:/etc/grafana/dashboards
    networks:
      - app-network
    restart: unless-stopped

volumes:
  redis-data:
  mysql-data:
  prometheus-data:
  grafana-data:

networks:
  app-network:
    driver: bridge
CI/CD 파이프라인 구축 (GitHub Actions)
# .github/workflows/deploy.yml
name: Deploy OpenResty Application

on:
  push:
    branches: [ main ]
  pull_request:
    branches: [ main ]

env:
  REGISTRY: ghcr.io
  IMAGE_NAME: ${{ github.repository }}

jobs:
  test:
    runs-on: ubuntu-latest

    services:
      redis:
        image: redis:7.0-alpine
        options: >-
          --health-cmd "redis-cli ping"
          --health-interval 10s
          --health-timeout 5s
          --health-retries 5
        ports:
          - 6379:6379

      mysql:
        image: mysql:8.0
        env:
          MYSQL_ROOT_PASSWORD: test
          MYSQL_DATABASE: test_db
        options: >-
          --health-cmd="mysqladmin ping"
          --health-interval=10s
          --health-timeout=5s
          --health-retries=3
        ports:
          - 3306:3306

    steps:
    - name: Checkout code
      uses: actions/checkout@v3

    - name: Setup OpenResty
      run: |
        sudo apt-get update
        sudo apt-get install -y software-properties-common
        wget -qO - https://openresty.org/package/pubkey.gpg | sudo apt-key add -
        sudo add-apt-repository -y "deb http://openresty.org/package/ubuntu $(lsb_release -sc) main"
        sudo apt-get update
        sudo apt-get install -y openresty

    - name: Install dependencies
      run: |
        sudo /usr/local/openresty/luajit/bin/luarocks install lua-resty-mysql
        sudo /usr/local/openresty/luajit/bin/luarocks install lua-resty-redis
        sudo /usr/local/openresty/luajit/bin/luarocks install lua-cjson

    - name: Run Lua tests
      run: |
        cd tests
        /usr/local/openresty/bin/resty test_suite.lua

    - name: Integration tests
      run: |
        docker-compose -f docker-compose.test.yml up -d
        sleep 30
        curl -f http://localhost:8080/health || exit 1
        docker-compose -f docker-compose.test.yml down

  build-and-push:
    needs: test
    runs-on: ubuntu-latest
    if: github.event_name == 'push' && github.ref == 'refs/heads/main'

    steps:
    - name: Checkout code
      uses: actions/checkout@v3

    - name: Log in to Container Registry
      uses: docker/login-action@v2
      with:
        registry: ${{ env.REGISTRY }}
        username: ${{ github.actor }}
        password: ${{ secrets.GITHUB_TOKEN }}

    - name: Extract metadata
      id: meta
      uses: docker/metadata-action@v4
      with:
        images: ${{ env.REGISTRY }}/${{ env.IMAGE_NAME }}
        tags: |
          type=ref,event=branch
          type=sha,prefix=sha-
          type=raw,value=latest

    - name: Build and push Docker image
      uses: docker/build-push-action@v4
      with:
        context: .
        push: true
        tags: ${{ steps.meta.outputs.tags }}
        labels: ${{ steps.meta.outputs.labels }}

  deploy:
    needs: build-and-push
    runs-on: ubuntu-latest
    environment: production

    steps:
    - name: Deploy to production
      uses: appleboy/ssh-action@v0.1.5
      with:
        host: ${{ secrets.PROD_HOST }}
        username: ${{ secrets.PROD_USER }}
        key: ${{ secrets.PROD_SSH_KEY }}
        script: |
          cd /opt/openresty-app
          docker-compose pull
          docker-compose up -d --remove-orphans
          docker system prune -f
무중단 배포 스크립트
#!/bin/bash
# scripts/zero-downtime-deploy.sh

set -e

COMPOSE_FILE="docker-compose.yml"
SERVICE_NAME="app"
HEALTH_CHECK_URL="http://localhost:8080/health"
MAX_WAIT_TIME=120

echo "🚀 Starting zero-downtime deployment..."

# 현재 실행 중인 컨테이너 확인
CURRENT_CONTAINERS=$(docker-compose ps -q $SERVICE_NAME)

if [ -z "$CURRENT_CONTAINERS" ]; then
    echo "❌ No running containers found. Starting fresh deployment..."
    docker-compose up -d
    exit 0
fi

echo "📦 Building new image..."
docker-compose build $SERVICE_NAME

echo "🔄 Starting new containers..."
docker-compose up -d --scale $SERVICE_NAME=2 --no-recreate

# 새 컨테이너가 시작될 때까지 대기
echo "⏳ Waiting for new containers to be ready..."
NEW_CONTAINERS=$(docker-compose ps -q $SERVICE_NAME | head -n1)

# 헬스체크 수행
WAIT_TIME=0
while [ $WAIT_TIME -lt $MAX_WAIT_TIME ]; do
    if curl -f $HEALTH_CHECK_URL >/dev/null 2>&1; then
        echo "✅ New containers are healthy!"
        break
    fi

    echo "⏳ Waiting for health check... ($WAIT_TIME/$MAX_WAIT_TIME)"
    sleep 5
    WAIT_TIME=$((WAIT_TIME + 5))
done

if [ $WAIT_TIME -ge $MAX_WAIT_TIME ]; then
    echo "❌ Health check failed. Rolling back..."
    docker-compose up -d --scale $SERVICE_NAME=1
    exit 1
fi

echo "🔧 Updating load balancer configuration..."
# Nginx 설정 리로드 (실제 환경에서는 로드밸런서 API 호출)
docker-compose exec nginx-lb nginx -s reload

echo "⏹️ Stopping old containers..."
docker stop $CURRENT_CONTAINERS

echo "🧹 Cleaning up old containers..."
docker rm $CURRENT_CONTAINERS

echo "✅ Zero-downtime deployment completed successfully!"
프로덕션 모니터링 설정
# monitoring/prometheus.yml
global:
  scrape_interval: 15s
  evaluation_interval: 15s

rule_files:
  - "rules/*.yml"

scrape_configs:
  - job_name: 'openresty'
    static_configs:
      - targets: ['app:8080']
    metrics_path: '/metrics'
    scrape_interval: 5s

  - job_name: 'redis'
    static_configs:
      - targets: ['redis:6379']

  - job_name: 'mysql'
    static_configs:
      - targets: ['mysql:3306']

alerting:
  alertmanagers:
    - static_configs:
        - targets:
          - alertmanager:9093
# monitoring/rules/openresty-alerts.yml
groups:
- name: openresty.rules
rules:
- alert: HighErrorRate
expr: (rate(http_requests_total{status=~"5.."}[5m]) / rate(http_requests_total[5m])) > 0.05
for: 2m
labels:
severity: critical
annotations:
summary: "High error rate detected"
description: "Error rate is above 5% for more than 2 minutes"
- alert: HighResponseTime
expr: histogram_quantile(0.95, rate(http_request_duration_seconds_bucket[5m])) > 2
for: 5m
labels:
severity: warning
annotations:
summary: "High response time detected"
description: "95th percentile response time is above 2 seconds"
- alert: HighMemoryUsage
expr: process_resident_memory_bytes > 500000000
for: 5m
labels:
severity: warning
annotations:
summary: "High memory usage detected"
description: "Memory usage is above 500MB"마무리 및 추가 학습 리소스
이번 글에서는 OpenResty를 활용한 고성능 웹 서버 구축의 모든 과정을 살펴보았습니다.
Nginx와 Lua의 강력한 조합을 통해 기존의 웹 서버 한계를 뛰어넘는 성능과 유연성을 확보할 수 있음을 확인했습니다.
핵심 포인트 요약
OpenResty의 주요 장점
OpenResty는 단순한 웹 서버가 아닌 완전한 웹 애플리케이션 플랫폼입니다.
이벤트 기반 비동기 아키텍처와 LuaJIT의 고성능 실행 환경을 통해, 수천 개의 동시 연결을 효율적으로 처리하면서도 복잡한 비즈니스 로직을 구현할 수 있습니다.
실전 개발에서의 활용
실제 프로덕션 환경에서 OpenResty를 사용할 때는 단순한 기능 구현을 넘어서, 캐싱 전략, 보안 강화, 모니터링, 배포 자동화 등 전체적인 시스템 아키텍처를 고려해야 합니다.
이번 글에서 다룬 레이트 리미팅, 구조화된 로깅, 무중단 배포 등의 기법들은 실무에서 즉시 활용할 수 있는 검증된 패턴들입니다.
성능 벤치마크 및 비교
다양한 성능 테스트에서 OpenResty는 기존의 Apache, Nginx + PHP-FPM, Node.js 등과 비교하여 현저히 우수한 성능을 보여줍니다.
특히 I/O 집약적인 작업과 실시간 데이터 처리에서 그 차이가 더욱 두드러집니다.
추천 학습 자료 및 커뮤니티
공식 문서 및 가이드
실습 및 예제 프로젝트
커뮤니티 및 지원
다음 단계 학습 방향
OpenResty 마스터를 위한 심화 학습 주제들:
고급 아키텍처 패턴
- 마이크로서비스 아키텍처에서의 API Gateway 구현
- 서비스 메시(Service Mesh) 구축
- 멀티 테넌트 애플리케이션 설계
고성능 최적화 기법
- CPU 및 메모리 프로파일링
- 네트워크 튜닝
- 캐시 계층 최적화
운영 및 DevOps
- Kubernetes 환경에서의 OpenResty 배포
- 서비스 디스커버리 통합
- 자동 스케일링 구현
마무리
OpenResty는 현대 웹 개발에서 요구되는 고성능, 확장성, 유연성을 모두 만족시키는 탁월한 플랫폼입니다.
이전 시리즈에서 학습한 루아 코루틴과 비동기 프로그래밍 지식을 바탕으로,
이번 글에서 다룬 실전 기법들을 활용한다면 세계 수준의 웹 애플리케이션을 구축할 수 있을 것입니다.
실제 프로젝트에 OpenResty를 도입할 때는 단계별로 접근하여,
먼저 간단한 API 서버부터 시작해서 점진적으로 복잡한 기능들을 추가해 나가는 것을 권장합니다.
이를 통해 OpenResty의 강력함을 체감하고, 더 나은 웹 애플리케이션을 개발할 수 있을 것입니다.
'프로그래밍 언어 실전 가이드' 카테고리의 다른 글
| 루아 입문 시리즈 #10: NodeMCU IoT 프로젝트 (0) | 2025.06.28 |
|---|---|
| 루아 입문 시리즈 #9: LÖVE 2D 게임 개발 입문 (0) | 2025.06.26 |
| 루아 입문 시리즈 #7: 코루틴과 비동기 프로그래밍 - 협력적 멀티태스킹의 완전 정복 (0) | 2025.06.13 |
| 루아 입문 시리즈 #6: 루아와 C 연동 프로그래밍 (0) | 2025.06.13 |
| 루아 입문 시리즈 #5: 루아 에러 처리와 디버깅 완벽 가이드 - 안정적인 Lua 애플리케이션 개발을 위한 실전 기법 (0) | 2025.06.13 |


