이 글에서 얻을 수 있는 것
- 완전 초보자도 30분 만에 루아 기본 문법 이해
- 실무에서 바로 활용 가능한 코드 예제 20개
- VSCode 개발환경 구축 스텝바이스텝 가이드
- 2025년 최신 루아 5.4 기능과 변경사항
- 게임개발부터 임베디드까지 실제 활용 사례
루아(Lua)란? 2025년에도 주목받는 이유
루아는 1993년 브라질 PUC-Rio 대학에서 탄생한 경량 스크립팅 언어입니다.
"달"을 의미하는 포르투갈어에서 이름을 따온 이 언어는, 30년이 지난 지금도 현역에서 활약하고 있습니다.
2025년 루아가 뜨는 이유
-- 단 5줄로 HTTP 서버 구현 (OpenResty 사용)
local http = require "resty.http"
local httpc = http.new()

ngx.say("Hello from Lua in 2025!")
ngx.exit(200)
왜 2025년에도 루아를 배워야 할까요?
- 🎮 게임 산업의 표준: World of Warcraft, Roblox, Corona SDK
- ⚡ 임베디드 시스템의 강자: NodeMCU, OpenWrt 등 IoT 디바이스
- 🌐 웹 성능의 비밀무기: Nginx + OpenResty로 초고속 웹서버
- ☁️ 클라우드 네이티브: Kong Gateway, Redis 확장
- 🤖 AI/ML 파이프라인: Torch (현재는 PyTorch의 전신)
💡 실무 인사이트: 네이버, 카카오 등 국내 대기업에서도 루아를 활용한 고성능 시스템을 운영 중입니다.
루아의 독특한 장점
| 특징 | 루아 | Python | JavaScript |
|---|---|---|---|
| 메모리 사용량 | ~200KB | ~15MB | ~10MB |
| 시작 속도 | 0.001초 | 0.1초 | 0.05초 |
| C 통합성 | ⭐⭐⭐⭐⭐ | ⭐⭐⭐ | ⭐⭐ |
| 학습 난이도 | 쉬움 | 쉬움 | 보통 |
5분 만에 완성하는 개발환경 구축
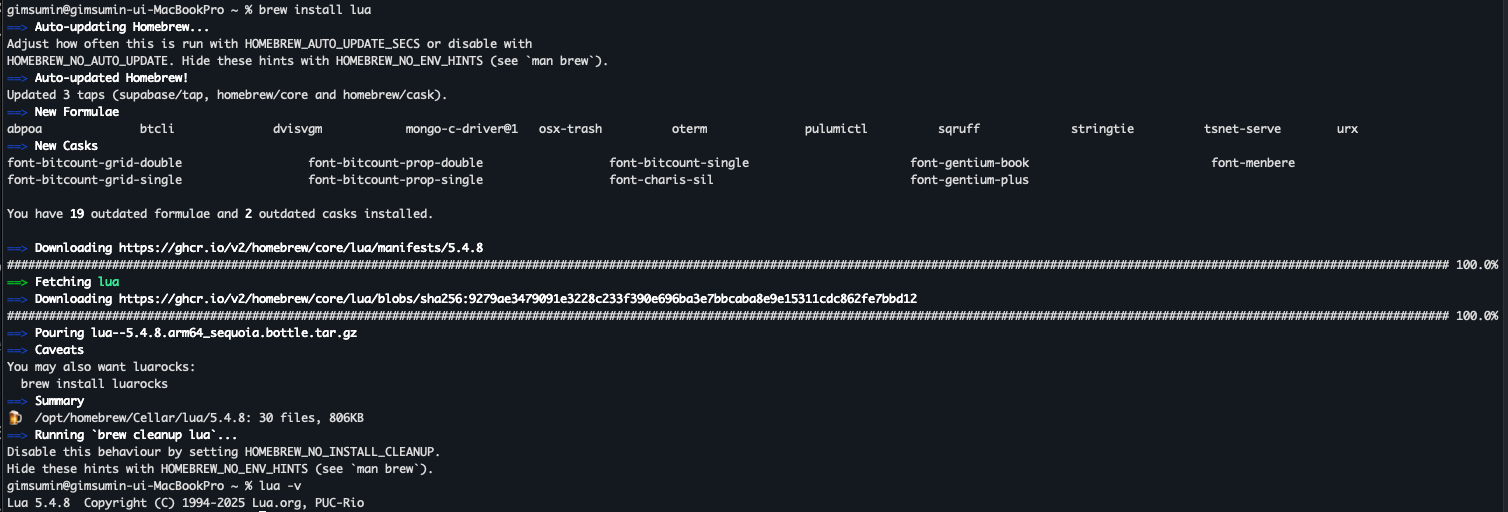
1단계: 루아 설치
# Windows (Chocolatey)
choco install lua

# macOS (Homebrew)
brew install lua

# Ubuntu/Debian
sudo apt update && sudo apt install lua5.4

# Arch Linux
sudo pacman -S lua

# 설치 확인
lua -v
2단계: VSCode 완벽 설정


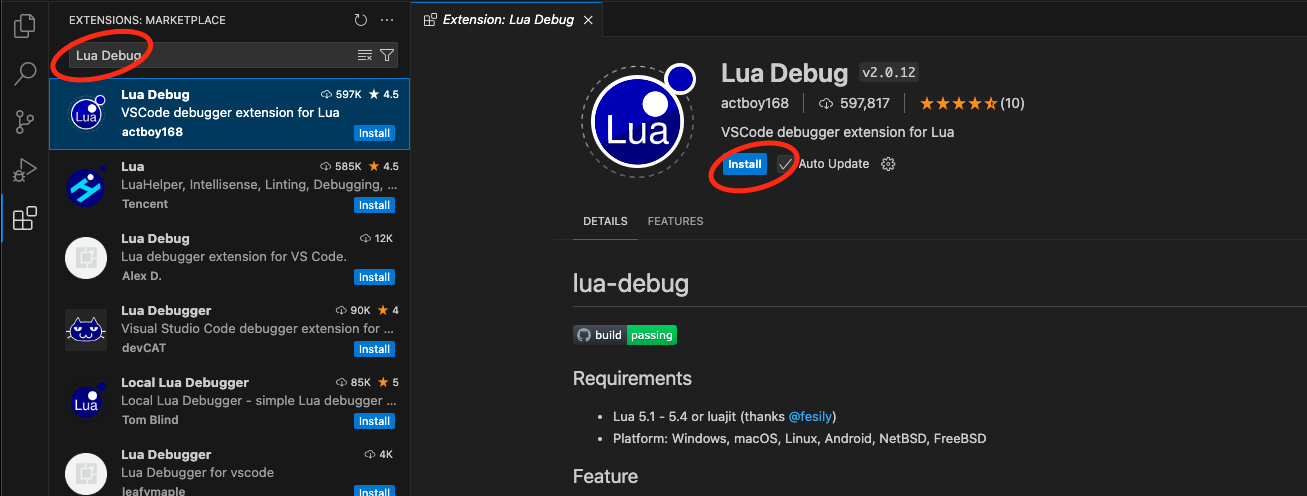
필수 확장 프로그램
- Lua (sumneko) - 강력한 루아 언어 지원과 문법 검사
- Code Runner - 루아 코드 즉시 실행
- Lua Debug - 디버깅과 중단점 설정
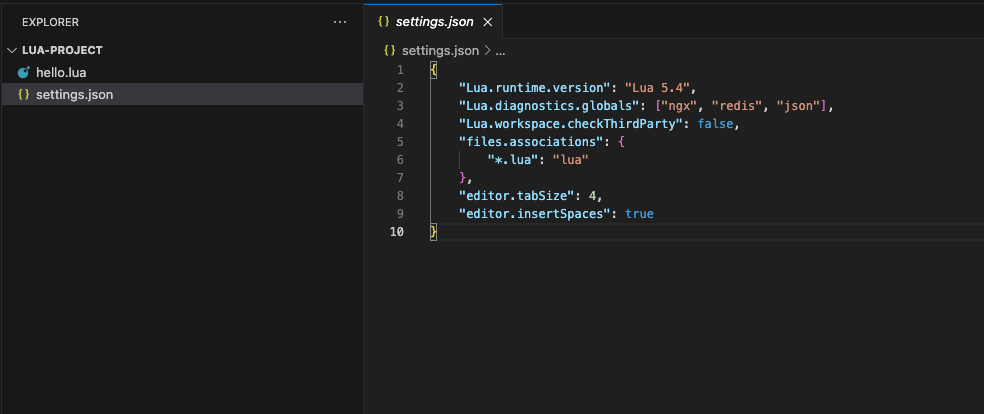
3단계: 개발환경 최적화
VSCode 설정 파일 (settings.json)
{
    "Lua.runtime.version": "Lua 5.4",
    "Lua.diagnostics.globals": ["ngx", "redis", "json"],
    "Lua.workspace.checkThirdParty": false,
    "files.associations": {
        "*.lua": "lua"
    },
    "editor.tabSize": 4,
    "editor.insertSpaces": true
}
4단계: 첫 번째 루아 프로그램
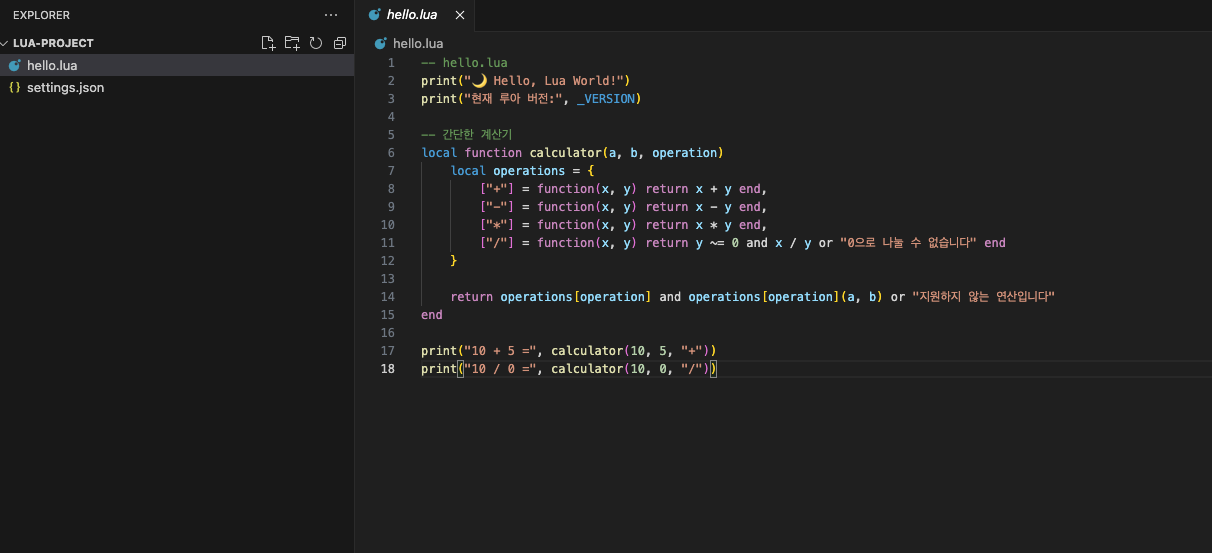
-- hello.lua
print("🌙 Hello, Lua World!")
print("현재 루아 버전:", _VERSION)

-- 간단한 계산기
local function calculator(a, b, operation)
    local operations = {
        ["+"] = function(x, y) return x + y end,
        ["-"] = function(x, y) return x - y end,
        ["*"] = function(x, y) return x * y end,
        ["/"] = function(x, y) return y ~= 0 and x / y or "0으로 나눌 수 없습니다" end
    }

    return operations[operation] and operations[operation](a, b) or "지원하지 않는 연산입니다"
end

print("10 + 5 =", calculator(10, 5, "+"))
print("10 / 0 =", calculator(10, 0, "/"))
lua 개발 환경 셋팅이 끝났습니다!
루아 기본 문법 완전정복
변수 선언과 스코프: local vs global
-- 전역 변수 (권장하지 않음)
globalVar = "전역 변수입니다"

-- 지역 변수 (권장)
local localVar = "지역 변수입니다"

-- 여러 변수 동시 선언
local a, b, c = 1, 2, 3
local x, y = 10  -- y는 nil이 됨

-- 변수 교환
local first, second = "A", "B"
first, second = second, first
print(first, second) -- B A
루아의 8가지 데이터 타입 완전 가이드
-- 1. nil: 값이 없음
local nothing = nil
print(type(nothing))  -- nil

-- 2. boolean: 참/거짓
local isTrue = true
local isFalse = false

-- 3. number: 정수와 실수 (모두 float로 처리)
local integer = 42
local float = 3.14159
local scientific = 1.23e-4
local hex = 0xff

-- 4. string: 문자열
local str1 = "작은 따옴표"
local str2 = '큰 따옴표'
local multiline = [[
여러 줄
문자열
]]

-- 5. function: 함수
local func = function() return "함수" end

-- 6. userdata: C 데이터 (고급 주제)
-- 7. thread: 코루틴
-- 8. table: 테이블 (아래에서 자세히 설명)
연산자 완전 정리
-- 산술 연산자
local a, b = 10, 3
print(a + b)    -- 13 (덧셈)
print(a - b)    -- 7  (뺄셈)
print(a * b)    -- 30 (곱셈)
print(a / b)    -- 3.333... (실수 나눗셈)
print(a // b)   -- 3 (정수 나눗셈, Lua 5.3+)
print(a % b)    -- 1 (나머지)
print(a ^ b)    -- 1000 (거듭제곱)

-- 관계 연산자
print(a == b)   -- false (같음)
print(a ~= b)   -- true  (다름)
print(a > b)    -- true  (큼)
print(a < b)    -- false (작음)
print(a >= b)   -- true  (크거나 같음)
print(a <= b)   -- false (작거나 같음)

-- 논리 연산자
print(true and false)  -- false
print(true or false)   -- true
print(not true)        -- false

-- 연결 연산자
print("Hello" .. " " .. "World")  -- Hello World

-- 길이 연산자
print(#"Hello")        -- 5
print(#{1, 2, 3, 4})   -- 4
조건문과 분기 처리
local score = 85

-- if-then-else 문
if score >= 90 then
    print("A 등급")
elseif score >= 80 then
    print("B 등급")
elseif score >= 70 then
    print("C 등급")
else
    print("재시험 필요")
end

-- 삼항 연산자 스타일 (논리 연산자 활용)
local result = score >= 60 and "합격" or "불합격"
print(result)

-- 단축 평가 (short-circuit evaluation)
local name = nil
local displayName = name or "이름 없음"
print(displayName)  -- 이름 없음
반복문 마스터하기
-- 1. while 반복문
local i = 1
while i <= 5 do
    print("while: " .. i)
    i = i + 1
end

-- 2. repeat-until 반복문 (do-while과 유사)
local j = 1
repeat
    print("repeat: " .. j)
    j = j + 1
until j > 5

-- 3. for 반복문 (numeric for)
for k = 1, 5 do
    print("for: " .. k)
end

-- step 지정
for k = 10, 1, -2 do  -- 10, 8, 6, 4, 2
    print("step: " .. k)
end

-- 4. for 반복문 (generic for)
local fruits = {"사과", "바나나", "오렌지"}

-- ipairs: 배열 순회 (인덱스와 값)
for index, fruit in ipairs(fruits) do
    print(index, fruit)
end

-- pairs: 모든 키-값 순회
local person = {name="김루아", age=30, city="서울"}
for key, value in pairs(person) do
    print(key, value)
end

-- break와 continue 대체
for i = 1, 10 do
    if i == 3 then
        goto continue  -- Lua 5.2+에서 지원
    end
    if i == 8 then
        break
    end
    print(i)
    ::continue::
end
문자열 다루기 심화
-- 문자열 기본 함수들
local text = "Hello, Lua Programming!"

print(string.len(text))           -- 길이: 22
print(#text)                      -- 길이: 22 (축약형)
print(string.upper(text))         -- 대문자 변환
print(string.lower(text))         -- 소문자 변환
print(string.sub(text, 1, 5))     -- 부분 문자열: Hello
print(string.sub(text, -12))      -- 뒤에서부터: Programming!

-- 문자열 찾기와 치환
print(string.find(text, "Lua"))              -- 8 10 (시작, 끝 위치)
print(string.gsub(text, "Lua", "루아"))       -- 치환
print(string.match(text, "%a+"))             -- 첫 번째 단어 매칭

-- 문자열 분할 함수 (직접 구현)
local function split(str, delimiter)
    local result = {}
    local pattern = "([^" .. delimiter .. "]+)"
    for match in string.gmatch(str, pattern) do
        table.insert(result, match)
    end
    return result
end

local words = split("apple,banana,orange", ",")
for i, word in ipairs(words) do
    print(i, word)
end

-- 문자열 포맷팅
local name, age = "김루아", 25
print(string.format("이름: %s, 나이: %d세", name, age))
print(string.format("원주율: %.2f", math.pi))
테이블: 루아의 핵심 자료구조
-- 배열 스타일 테이블
local colors = {"red", "green", "blue"}
print(colors[1])        -- red (1부터 시작!)
print(#colors)          -- 3 (배열 길이)

-- 요소 추가/제거
table.insert(colors, "yellow")       -- 맨 뒤에 추가
table.insert(colors, 2, "purple")    -- 2번 위치에 삽입
table.remove(colors, 1)              -- 1번 요소 제거
table.remove(colors)                 -- 마지막 요소 제거

-- 해시 테이블 스타일
local student = {
    name = "김학생",
    age = 20,
    subjects = {"수학", "과학", "영어"}
}

-- 점 표기법과 대괄호 표기법
print(student.name)      -- 김학생
print(student["age"])    -- 20

-- 동적 키 접근
local key = "name"
print(student[key])      -- 김학생

-- 테이블 순회 방법들
local data = {a=1, b=2, c=3, [1]="첫번째", [2]="두번째"}

-- pairs: 모든 키-값 쌍
for k, v in pairs(data) do
    print(k, v)
end

-- ipairs: 연속된 정수 인덱스만
for i, v in ipairs(data) do
    print(i, v)
end

-- next 함수 활용
for k, v in next, data, nil do
    print(k, v)
end
함수 정의와 활용법
-- 기본 함수 정의
function greet(name)
    return "안녕하세요, " .. name .. "님!"
end

-- 지역 함수
local function localGreet(name)
    return "Hello, " .. name .. "!"
end

-- 익명 함수
local anonymous = function(x, y)
    return x + y
end

-- 다중 반환값
function divide(a, b)
    if b == 0 then
        return nil, "0으로 나눌 수 없습니다"
    end
    return a / b, "성공"
end

local result, message = divide(10, 2)
print(result, message)  -- 5 성공

-- 가변 인자 함수
function sum(...)
    local args = {...}  -- 테이블로 패킹
    local total = 0
    for i = 1, #args do
        total = total + args[i]
    end
    return total
end

print(sum(1, 2, 3, 4, 5))  -- 15

-- 선택적 매개변수
function createUser(name, age, email)
    age = age or 18        -- 기본값 설정
    email = email or "없음"

    return {
        name = name,
        age = age,
        email = email
    }
end

local user = createUser("김루아")
print(user.name, user.age, user.email)  -- 김루아 18 없음
스코프와 클로저 이해하기
-- 지역 변수와 전역 변수
local x = 10  -- 지역 변수

function testScope()
    local y = 20    -- 함수 지역 변수
    z = 30          -- 전역 변수 (local 없음)
    print(x, y, z)  -- 10 20 30
end

testScope()
print(z)  -- 30 (전역이므로 접근 가능)
-- print(y)  -- 오류! y는 지역 변수

-- 클로저 활용
function createCounter()
    local count = 0
    return function()
        count = count + 1
        return count
    end
end

local counter1 = createCounter()
local counter2 = createCounter()

print(counter1())  -- 1
print(counter1())  -- 2
print(counter2())  -- 1 (독립적인 카운터)
실무에서 자주 쓰는 고급 기능
메타테이블: 객체지향의 비밀
-- 🏗️ 실무급 클래스 구현
local BankAccount = {}
BankAccount.__index = BankAccount

function BankAccount.new(owner, initialBalance)
    local self = setmetatable({}, BankAccount)
    self.owner = owner
    self.balance = initialBalance or 0
    self.transactions = {}
    return self
end

function BankAccount:deposit(amount)
    if amount <= 0 then
        error("입금액은 0보다 커야 합니다")
    end

    self.balance = self.balance + amount
    table.insert(self.transactions, {
        type = "입금",
        amount = amount,
        timestamp = os.time(),
        balance = self.balance
    })

    return self -- 메서드 체이닝 지원
end

function BankAccount:withdraw(amount)
    if amount <= 0 then
        error("출금액은 0보다 커야 합니다")
    end

    if self.balance < amount then
        error("잔액이 부족합니다")
    end

    self.balance = self.balance - amount
    table.insert(self.transactions, {
        type = "출금",
        amount = amount,
        timestamp = os.time(),
        balance = self.balance
    })

    return self
end

-- 💳 사용 예시
local account = BankAccount.new("김개발자", 1000)
account:deposit(500):withdraw(200) -- 메서드 체이닝!

print(string.format("%s님의 현재 잔액: %d원",
    account.owner, account.balance))
코루틴: 비동기의 아름다움
-- 🔄 실제 웹 크롤러에서 사용하는 패턴
local function webCrawler(urls)
    return coroutine.create(function()
        for i, url in ipairs(urls) do
            print(string.format("🌐 크롤링 중: %s", url))

            -- 실제로는 HTTP 요청
            local content = string.format("Content from %s", url)

            coroutine.yield({
                url = url,
                content = content,
                progress = i / #urls * 100
            })
        end

        return "크롤링 완료!"
    end)
end

-- 📊 사용 예시
local urls = {
    "https://example1.com",
    "https://example2.com",
    "https://example3.com"
}

local crawler = webCrawler(urls)

while coroutine.status(crawler) ~= "dead" do
    local success, result = coroutine.resume(crawler)

    if success then
        if type(result) == "table" then
            print(string.format("✅ 진행률: %.1f%% - %s",
                result.progress, result.url))
        else
            print("🎉 " .. result) -- 최종 메시지
        end
    end
end
🎯 성능 최적화 팁과 베스트 프랙티스
메모리 효율적인 코드 작성
-- ❌ 비효율적인 방법
local function inefficientStringConcat(words)
    local result = ""
    for _, word in ipairs(words) do
        result = result .. word .. " " -- 매번 새 문자열 생성!
    end
    return result
end

-- ✅ 효율적인 방법
local function efficientStringConcat(words)
    return table.concat(words, " ") -- 한 번에 처리!
end

-- 📊 성능 테스트
local words = {}
for i = 1, 1000 do
    words[i] = "word" .. i
end

local start = os.clock()
local result1 = inefficientStringConcat(words)
local time1 = os.clock() - start

start = os.clock()
local result2 = efficientStringConcat(words)
local time2 = os.clock() - start

print(string.format("비효율적 방법: %.4f초", time1))
print(string.format("효율적 방법: %.4f초", time2))
print(string.format("성능 향상: %.1f배", time1 / time2))
실무에서 쓰는 디버깅 기법
-- 🐛 고급 디버깅 도구
local Debug = {}

function Debug.inspect(obj, name, depth)
    depth = depth or 0
    name = name or "object"

    local indent = string.rep("  ", depth)

    if type(obj) == "table" then
        print(string.format("%s%s = {", indent, name))
        for k, v in pairs(obj) do
            if type(v) == "table" and depth < 3 then -- 무한 재귀 방지
                Debug.inspect(v, tostring(k), depth + 1)
            else
                print(string.format("%s  %s = %s", indent, tostring(k), tostring(v)))
            end
        end
        print(string.format("%s}", indent))
    else
        print(string.format("%s%s = %s (%s)", indent, name, tostring(obj), type(obj)))
    end
end

-- 📈 성능 프로파일러
local function profile(func, name)
    return function(...)
        local start = os.clock()
        local results = {func(...)}
        local elapsed = os.clock() - start

        print(string.format("⏱️  %s 실행시간: %.4f초", name or "함수", elapsed))
        return table.unpack(results)
    end
end

-- 사용 예시
local slowFunction = profile(function(n)
    local sum = 0
    for i = 1, n do
        sum = sum + i
    end
    return sum
end, "합계 계산")

local result = slowFunction(1000000)
실전 프로젝트: CLI 도구 만들기
#!/usr/bin/env lua

-- 📦 파일 관리 CLI 도구
local FileManager = {}

function FileManager.help()
    print([[
🗂️  루아 파일 매니저 v1.0

사용법:
  lua filemgr.lua <명령> [옵션]

명령:
  list <디렉토리>     - 파일 목록 출력
  size <파일>         - 파일 크기 확인
  clean <디렉토리>    - 임시 파일 정리
  backup <파일>       - 파일 백업
  help               - 도움말 출력

예시:
  lua filemgr.lua list /home/user
  lua filemgr.lua size document.txt
  lua filemgr.lua clean /tmp
    ]])
end

function FileManager.listFiles(directory)
    directory = directory or "."

    local files = {}
    local pipe = io.popen(string.format('ls -la "%s"', directory))

    if pipe then
        for line in pipe:lines() do
            if not line:match("^total") and not line:match("^d") then
                local parts = {}
                for part in line:gmatch("%S+") do
                    table.insert(parts, part)
                end

                if #parts >= 9 then
                    table.insert(files, {
                        permissions = parts[1],
                        size = parts[5],
                        name = parts[9]
                    })
                end
            end
        end
        pipe:close()
    end

    -- 📊 결과 출력
    print(string.format("📁 %s 디렉토리 파일 목록:", directory))
    print(string.rep("-", 50))

    for _, file in ipairs(files) do
        print(string.format("%-20s %10s %s",
            file.name,
            file.size,
            file.permissions
        ))
    end

    print(string.format("\n총 %d개 파일", #files))
end

function FileManager.getFileSize(filename)
    local file = io.open(filename, "r")
    if not file then
        print(string.format("❌ 파일을 찾을 수 없습니다: %s", filename))
        return
    end

    local size = file:seek("end")
    file:close()

    -- 크기 단위 변환
    local units = {"B", "KB", "MB", "GB"}
    local unitIndex = 1
    local displaySize = size

    while displaySize >= 1024 and unitIndex < #units do
        displaySize = displaySize / 1024
        unitIndex = unitIndex + 1
    end

    print(string.format("📏 %s 파일 크기: %.2f %s (%d bytes)",
        filename, displaySize, units[unitIndex], size))
end

-- 🚀 메인 실행 부분
local function main(args)
    if #args == 0 then
        FileManager.help()
        return
    end

    local command = args[1]

    if command == "help" then
        FileManager.help()
    elseif command == "list" then
        FileManager.listFiles(args[2])
    elseif command == "size" then
        if not args[2] then
            print("❌ 파일명을 입력해주세요")
            return
        end
        FileManager.getFileSize(args[2])
    else
        print(string.format("❌ 알 수 없는 명령: %s", command))
        print("도움말을 보려면 'help'를 입력하세요")
    end
end

-- 스크립트가 직접 실행될 때만 main 함수 호출
if arg then
    main(arg)
end

return FileManager
2025년 루아 생태계와 진로
🔥 핫한 루아 프레임워크들
게임 개발
- LÖVE 2D: 2D 게임 개발의 강자
- Solar2D: 크로스플랫폼 모바일 게임
- Defold: King이 만든 게임 엔진
웹 개발
- OpenResty: Nginx + Lua = 초고성능 웹서버
- Lapis: 모던 웹 프레임워크
- Kong: API 게이트웨이의 대표주자
IoT & 임베디드
- NodeMCU: ESP8266/ESP32 개발
- OpenWrt: 라우터 펌웨어
- Wireshark: 네트워크 분석 스크립트
루아 개발자 취업 현황 (2025년)
| 분야 | 평균 연봉 | 주요 기업 | 전망 |
|---|---|---|---|
| 게임 개발 | 4,000-8,000만원 | 넷마블, 엔씨소프트 | 🔥🔥🔥 |
| 웹 성능 엔지니어 | 5,000-9,000만원 | 네이버, 카카오 | 🔥🔥🔥🔥 |
| IoT 개발자 | 3,500-6,000만원 | 삼성, LG전자 | 🔥🔥🔥 |
| DevOps 엔지니어 | 4,500-8,000만원 | 쿠팡, 배민 | 🔥🔥🔥🔥 |
학습 로드맵 추천
1단계 (1-2주): 기초 마스터
- 기본 문법과 데이터 타입
- 함수와 테이블 활용
- 간단한 스크립트 작성
2단계 (2-4주): 심화 학습
- 메타테이블과 객체지향
- 코루틴과 비동기 처리
- 모듈 시스템 이해
3단계 (1-2개월): 실무 적용
- 특정 분야 선택 (게임/웹/IoT)
- 프레임워크 학습
- 실제 프로젝트 개발
4단계 (지속적): 전문가 되기
- 오픈소스 기여
- 커뮤니티 활동
- 블로그 운영
추가 학습 리소스
필수 도서
- "Programming in Lua" - 루아 창시자가 쓴 바이블
- "Lua 성능 최적화" - 실무 성능 튜닝 기법
온라인 리소스
실습 플랫폼
마무리: 루아와 함께하는 개발 여정
루아는 "작지만 강력한" 언어의 완벽한 예시입니다.
30년간 사랑받아온 이유가 있죠.
핵심 포인트 요약
- ✅ 5분 설치, 30분 마스터 가능한 쉬운 언어
- ✅ 게임부터 웹서버까지 무궁무진한 활용도
- ✅ 2025년에도 현역인 실무 언어
- ✅ 높은 연봉과 좋은 전망의 개발자 커리어
이제 여러분도 루아의 매력에 빠져보세요!
다음 글
루아 입문 시리즈 #2: 루아(Lua) 함수와 클로저 – 함수형 프로그래밍 맛보기
루아 함수와 클로저 – 함수형 프로그래밍 맛보기
루아(Lua)는 간결하면서도 강력한 스크립트 언어로, 특히 게임 개발과 임베디드 시스템에서 널리 사용됩니다.이번 글에서는 루아의 함수와 클로저를 통해 함수형 프로그래밍의 핵심 개념을 살펴
notavoid.tistory.com
💬 이 글이 도움이 되셨나요? 댓글로 여러분의 루아 학습 경험을 공유해주세요!
'프로그래밍 언어 실전 가이드' 카테고리의 다른 글
| 루아 입문 시리즈 #6: 루아와 C 연동 프로그래밍 (0) | 2025.06.13 |
|---|---|
| 루아 입문 시리즈 #5: 루아 에러 처리와 디버깅 완벽 가이드 - 안정적인 Lua 애플리케이션 개발을 위한 실전 기법 (0) | 2025.06.13 |
| 루아 입문 시리즈 #4: 루아 모듈과 패키지 시스템 완벽 가이드 (0) | 2025.06.11 |
| 루아 입문 시리즈 #3: 루아 테이블 완전 정복 – 연관 배열부터 메타테이블까지 (1) | 2025.05.16 |
| 루아 입문 시리즈 #2: 루아(Lua) 함수와 클로저 – 함수형 프로그래밍 맛보기 (0) | 2025.05.15 |


